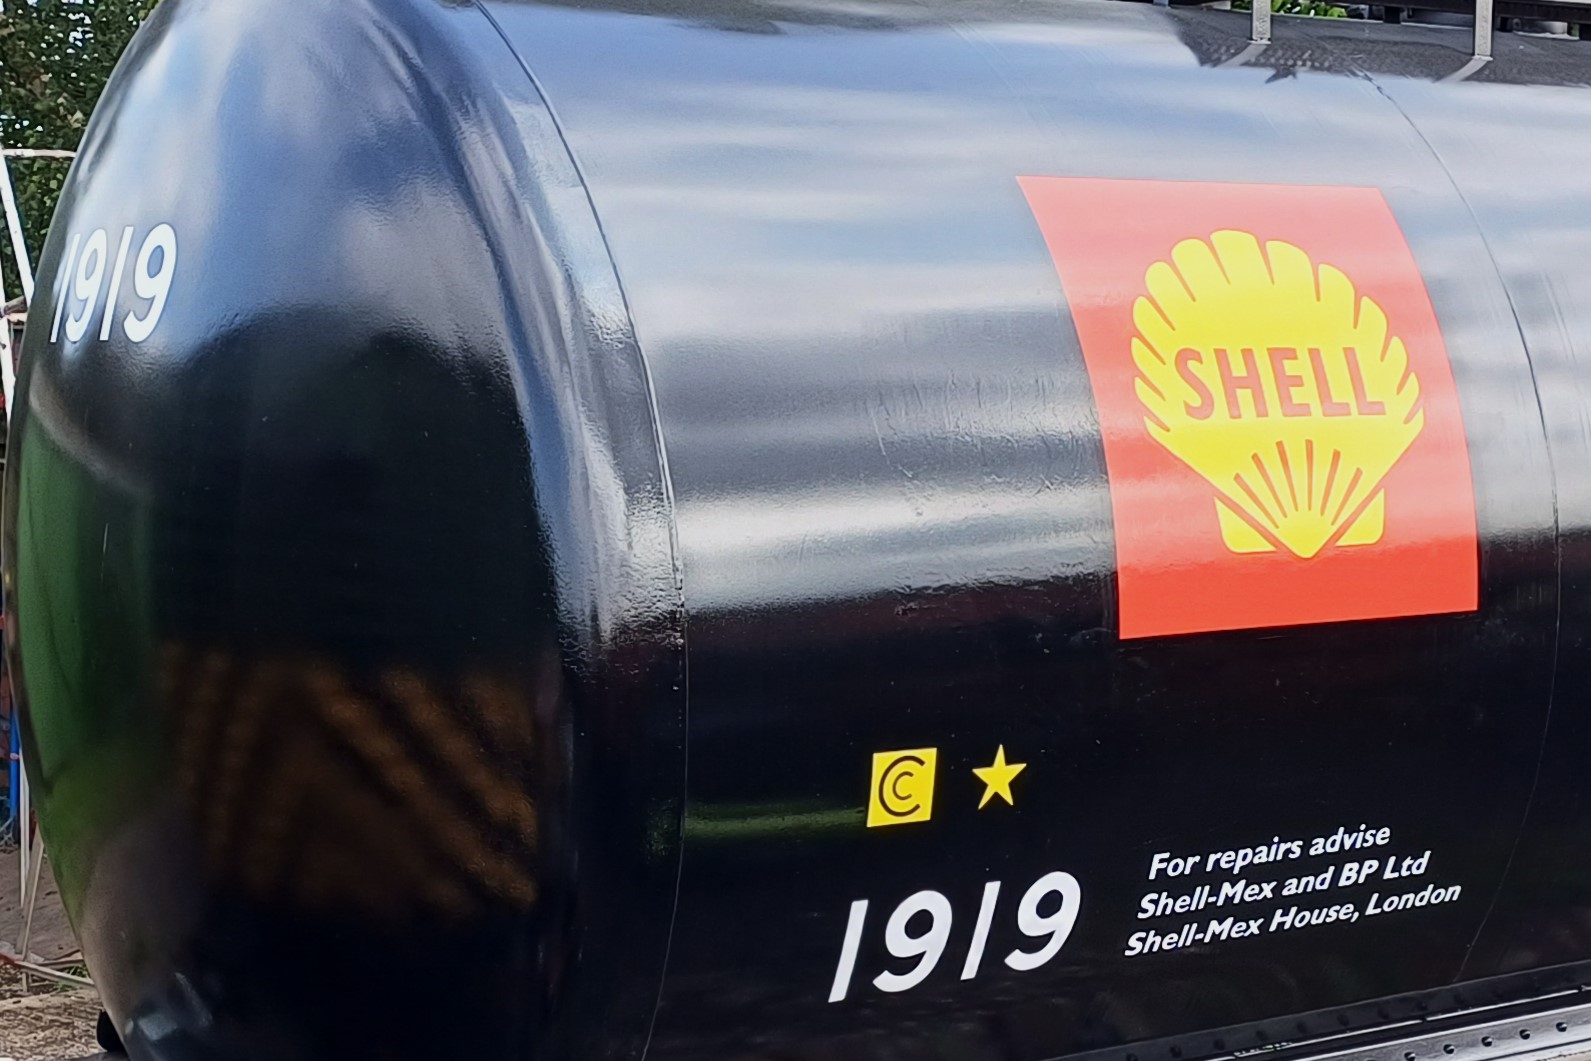
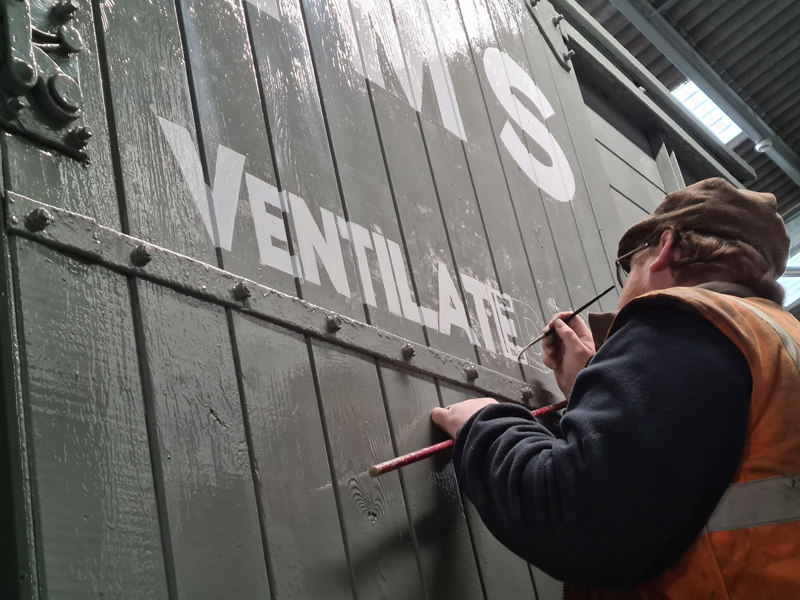
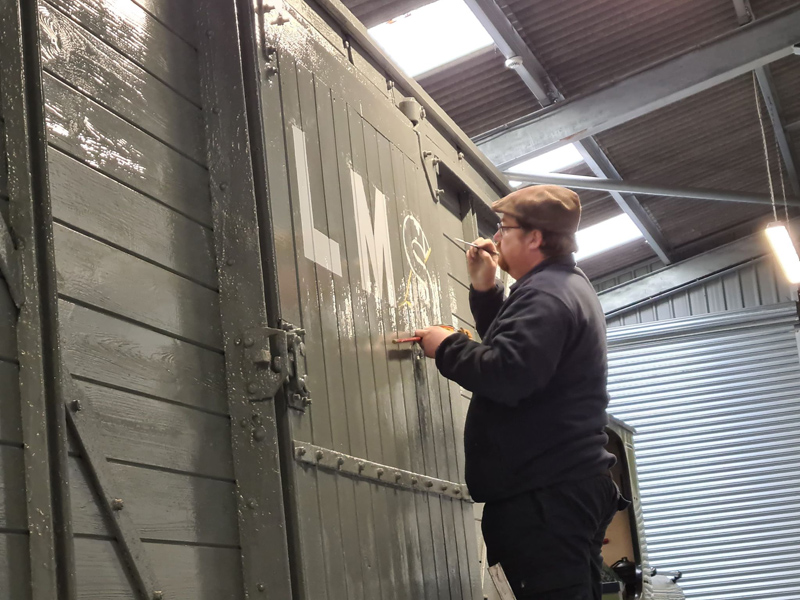
Hi all, we’ve had a few queries about how we go about applying the large logos or numbers to wagons such as the running numbers or Shell and BP logos on tank 1919; so here’s a brief insight of how we go about it.
1 – No, we don’t use vinyl’s or stickers !….
2 – we draw up templates on the computer (full size) then print them out full size; larger templates have to be printed in parts and pieced together to form the full size paper template.
3 – Once ready, the template has chalk rubbed to the back, rubbing over with fingers to ensure even application, then shake off any excess. White chalk is used for a black background, and red or blue coloured chalk for lighter areas.
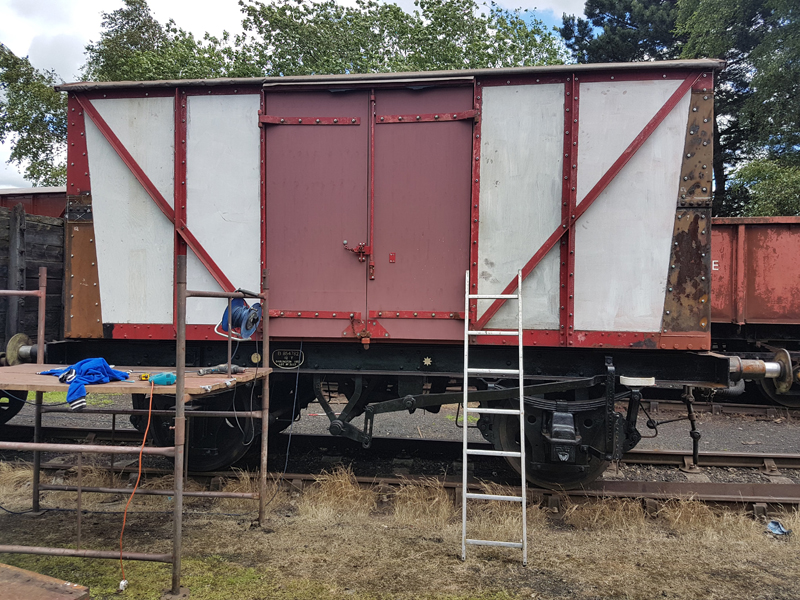
4 – Where necessary the wagon is prepared, such as for multi-colour logos where the background area is undercoated and the base colour applied.
5 – The template is then positioned onto the wagon and taped to hold it in position and ensure it’s flat to the surface.
6 – A pencil is then used to carefully trace around the outline of the logo or numbering
7 – The template is then removed to reveal an chalked outline of the numbering or logo on the wagon. It may be easy to see on the black, but not so clear on the yellow background !
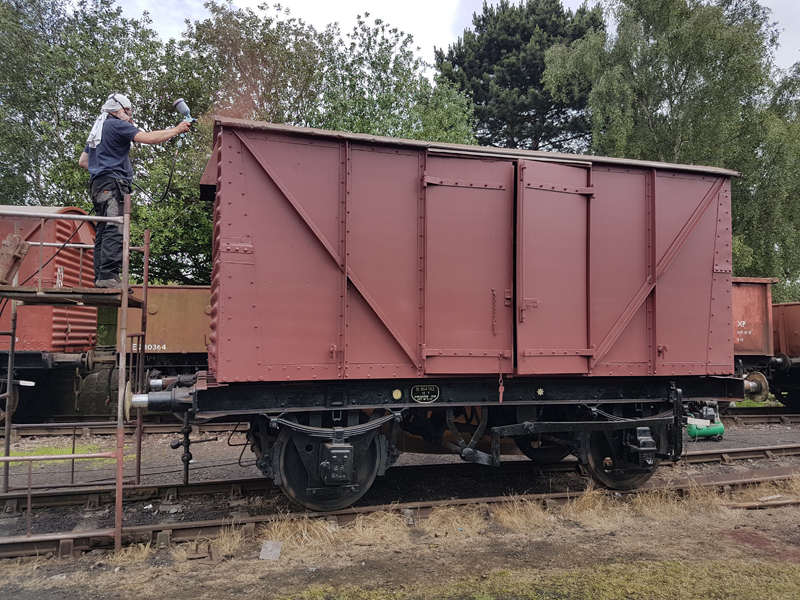
8 – It’s then time to get out the paint and brushes. Normally starting at the lower left corner so as to reduce the risk of resting the mahl stick in any wet paint. The chalk outline is used as a guide for painting the numbers or logo.
9 – For the larger logos the outlines are painted first using a signwriting brush, then the main areas painted with a larger brush.
10 – The completed logos are left to dry thoroughly, then a coat of varnish is applied to help them last a bit longer and deter fading.
Thanks for reading, all the best from the Quorn Wagon & Wagon team.
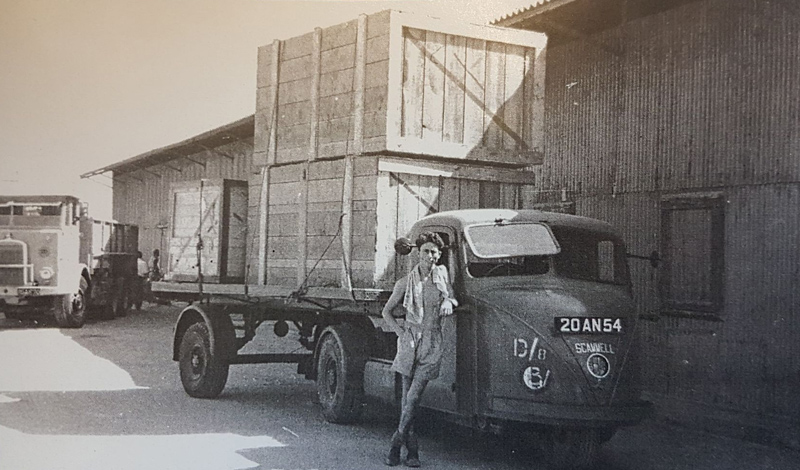
This story begins in June of 1953 at the Scammell Lorries Ltd factory, Tolpits Lane, West Watford, leaving the factory a 6T Scammell Scarab carrying the military registration 20 AN 52 and delivered to the Royal Air Force on the 26th June 1953.
RAF Scarab 20 AN 54 sister to our very own 20 AN 52
On the 17th July 1953 she was allocated to 14 Maintenance unit at RAF Carlisle, an aircraft equipment depot. This was followed by further moves on the 26th May 1955 to 35MU at RAF Heywood another aircraft equipment depot, then to 7MU RAF Quedgeley on the 4th Jan 1956, 250 MU RAF Bircotes on 31st Jan 56 before her final movement into storage at RAF Andover on 8th October 1957 being sold off to an ex forces vehicle dealer in Ely Cambridgeshire sometime after 22nd May 1970. When placed on the disposal list in 1970 she had accrued no more than 9000 miles over 17 years of service.
The story picks up again in the Early 1980s when two chaps by the name of Dave Wood and Martyn Upson bough the vehicle from the Ely dealer. It arrived running on 3 cylinders and they successfully worked to rectify this.
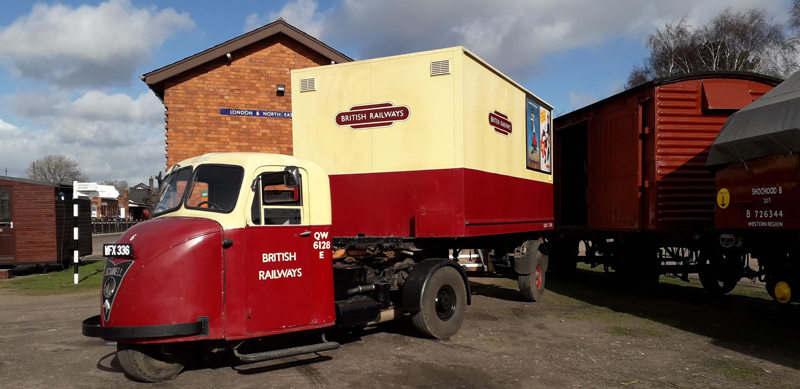
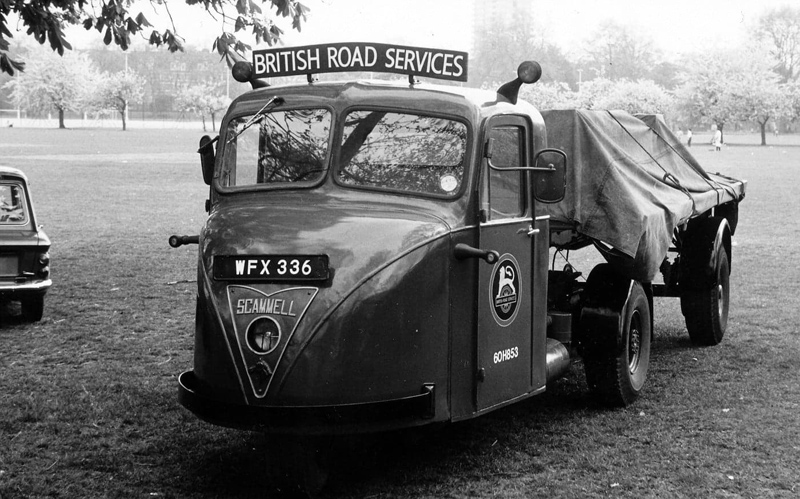
They decided to paint her in to a British Road Services livery, although a fictitious Red by mistake, she was registered WFX 336 in November 1982. In 1984 she took part in that years Brighton Run, using an Hilman Imp as a support vehicle. She also stared in an episode of One by One, filmed in the late 1980s the series followed the career of an international veterinary surgeon. With raising petrol prices a diesel Scarab was bought and she was sold to a Roger Tuplin, Roger bought a trailer, a genuine BR flat from Kings Cross station and after a number of years then sold her to a member of the Nene Valley Railway who fitted the insulated body from a Ford D series lorry to the trailer.
She then exchanged hands once again and she found ownership in Crowland, Lincolnshire and it was from this location our involvement begins.
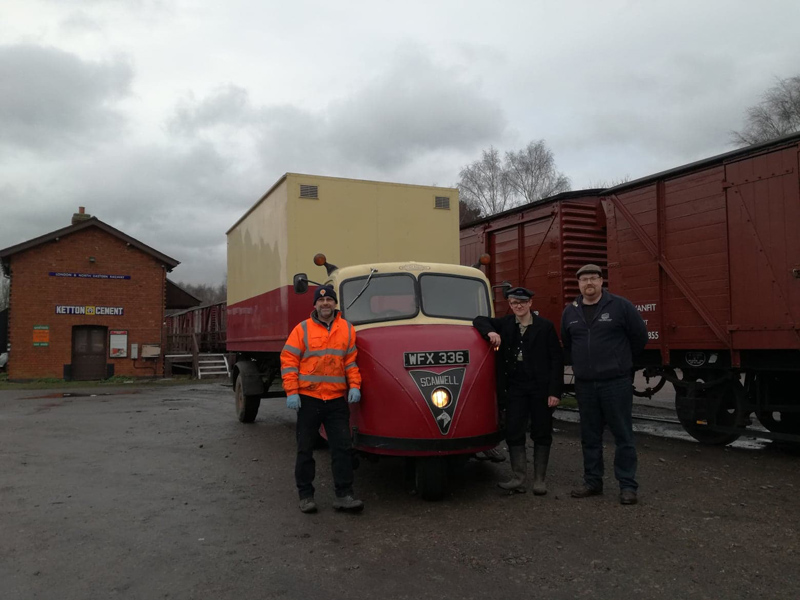
Towards the end of 2019 Dave Bower and I, along with Jack Arthur Shaw came together and purchased the vehicle, now christened Madge, she arrived at Quorn & Woodhouse on the 19th December 2019.
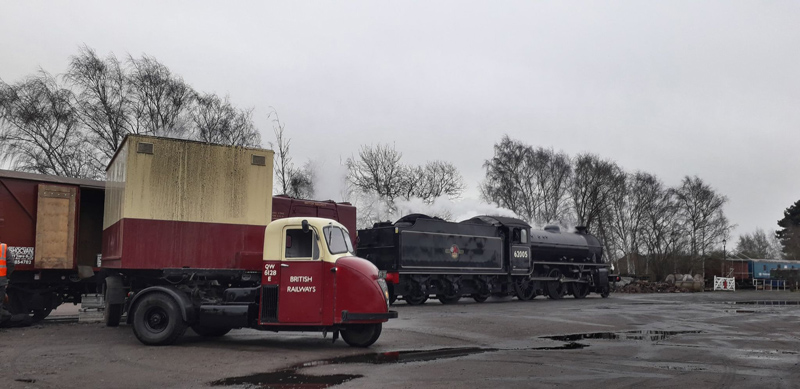
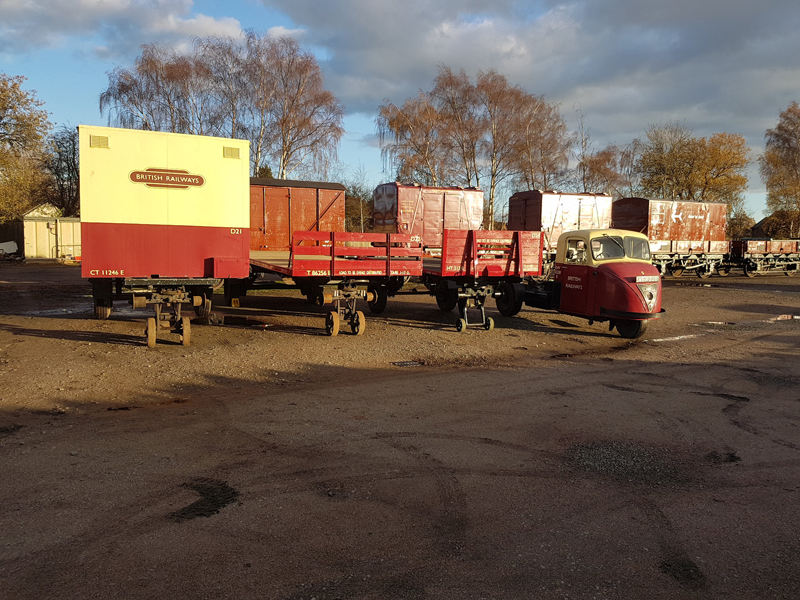
She arrived to us in a pseudo British Railways livery of Blood and Custard minus lettering and a little more Crimson that prototypical. Also part of the deal was the insulated body trailer. This had been kitted out as a living van and having spent a couple of nights in it I can state it is both warm and comfortable. Over our first Christmas we removed her indicators and painted the fuel tank, vacuum reservoir, oil bath, engine cover and rear wheels black, more in keeping with a BR Scarab, we also applied lettering and the fictional number QW 6128 E (6 tons and part of the station postcode) This was in preparation for her first public appearance at the GCRs Winter Gala 2020. This went down very well and with a last-minute Photo Charter appearance covering for poor lighting at the preferred location, her usefulness on-site was cemented.
A number of jobs continued on the trailer including adding BR totems, painting poster areas to the correct 40″x 60″ and adding the fictional number T 11246 E (Owners birthday dates).
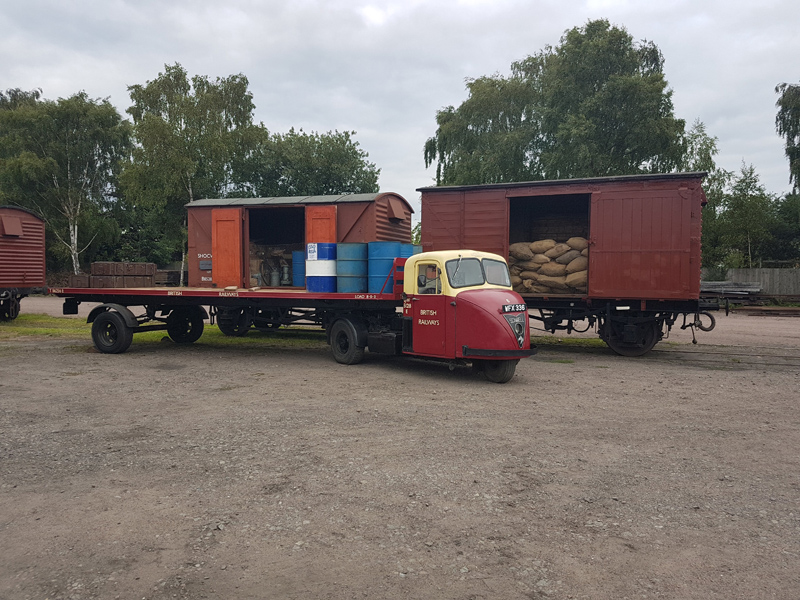
Our thoughts, however, turned towards the desires for a flat trailer. During a chance conversation whilst at work, a friend of one of our colleagues happened to have “a trailer with one of those couplers”. After viewing and negotiation, the former silage trailer and dolly arrived at Quorn in late January of 2020. This needed a little more than lettering and with the dolly uncoupled, a new floor, a full repaint, and the manufacture of a headstock it was first coupled to the Scarab in July 2020 after the first national lockdown. The Scarab and trailer combo then spent every subsequent open weekend on display until October.
With the completion of my 1958 built Aluminium Container, it was placed on the flat trailer for a number of weekends for public display before being loaded on to the Medfit
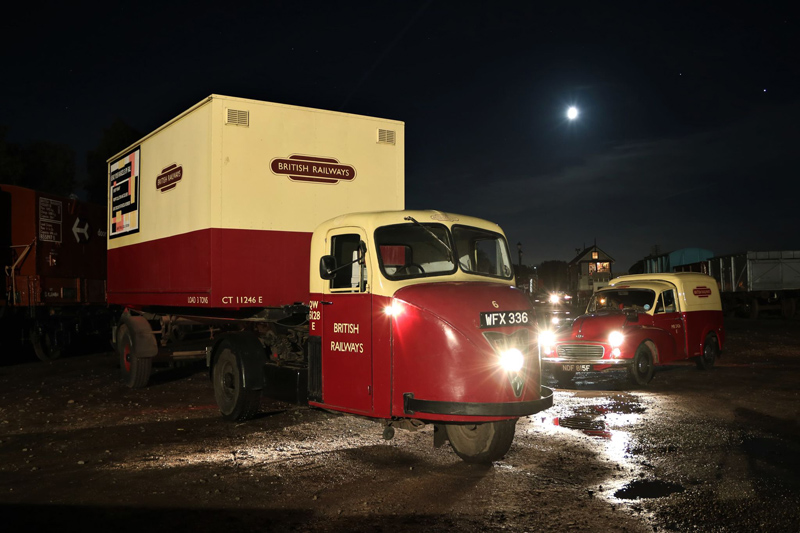
October saw another charter with the whole team and enactors in period dress and Madge joined by my Morris Minor Van, we created a number of cameos and succeeded in our aim of recreating a genuine steam era goods yard.
The desires for a shorter trailer came to ahead. With thanks to John Giles, of the Mechanical Horse Club, for his patience and advice, I completed the purchase of a Taskers 15ft trailer, it being repainted from Army Green to BR Crimson.
Our current fleet with a 3:1 ratio
The Scarabs are of course synonymous with British Railways and in 1958 over 7500 Scarabs and 30,000 trailers were in use with the company, that’s a ratio of 4 trailers to each Scarab. The whole ethos of the vehicle was to replace the horse providing a stronger, less labour intensive alternative whilst maintaining the manoeuvrability of a real horse.
That concludes the look at our resident Scarab and our lockdown features, with great delight we have been asked to support the GCRs aims to return to passenger operations on the 17th April 2021. Our fleet of engineering vehicles are overdue routine maintenance and this is to be our focus to support re-ballasting work required in the single line section as well as other engineering requirements to get the railway ready for services to resume.
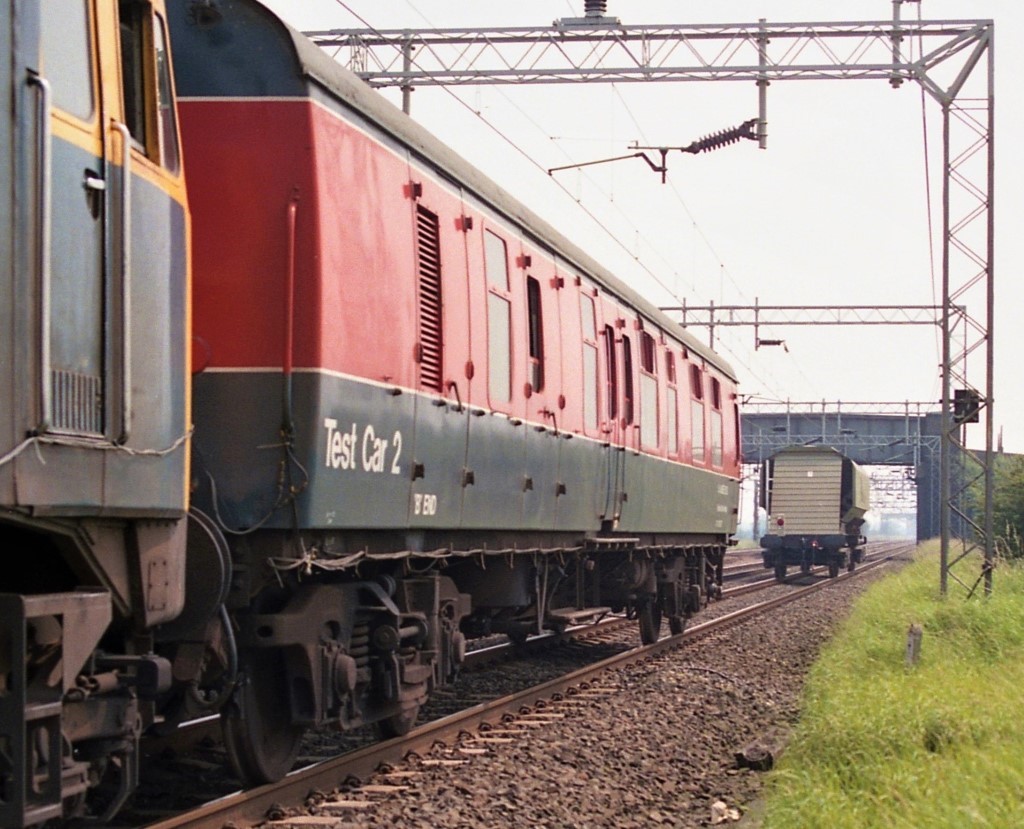
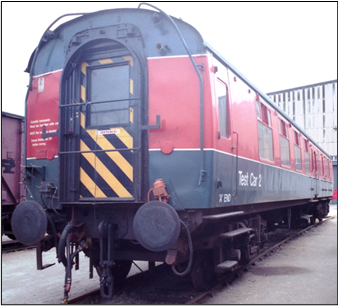
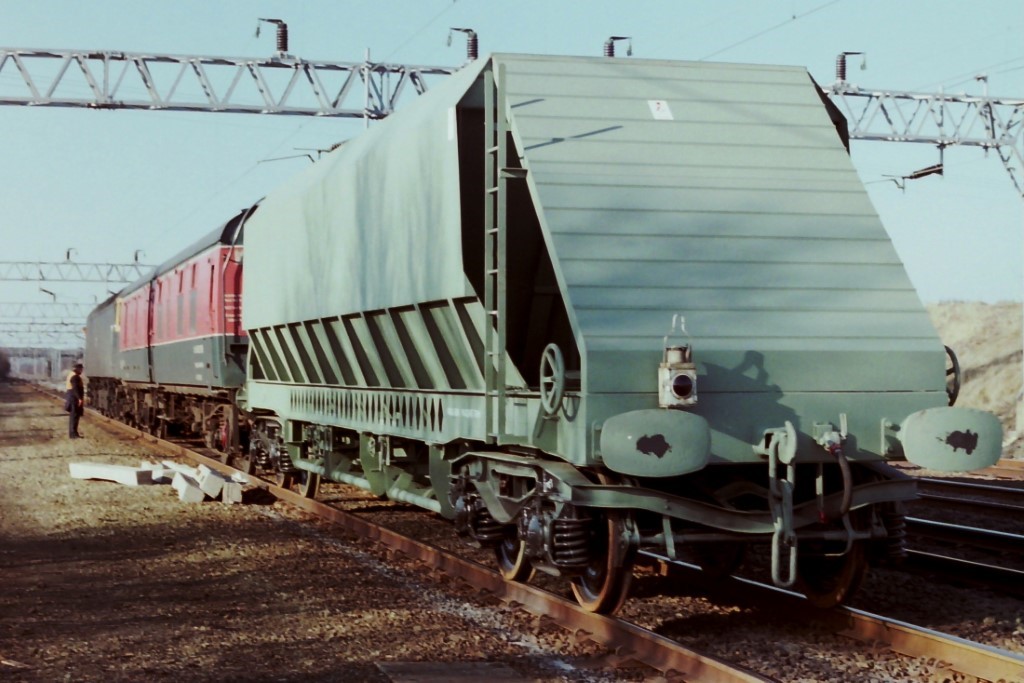
This week we’re taking a look at the work our Test Car 2 was built for, namely the slip/brake testing of freight wagons.
For 50 years from the late 1960s the acceptance of new or modified wagons onto British Rail included dynamic brake testing predominantly carried out using the slip/brake method. This test measures the brake stopping distance performance of the wagon independently, i.e. not coupled with other vehicles in a train.
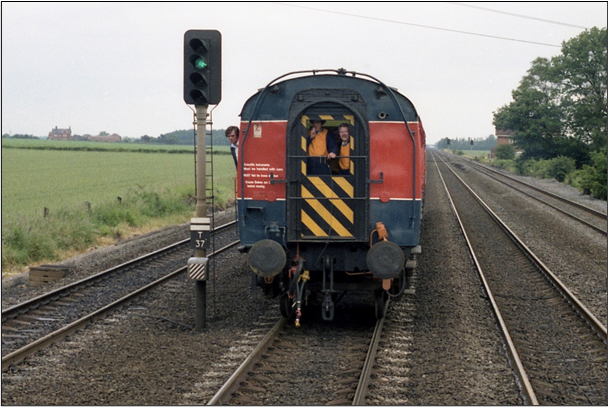
In order to conduct slip/brake testing a special coupling arrangement was used on Test Car 2, the design of which originated from use on North Eastern Railway J21 and J25 type steam locomotives providing banking assistance on the Darlington to Kirkby Stephen line over Stainmore Summit in the 1940s and 50s.
In addition to the slip coupling, the brake system on Test Car 2 was modified such that a test engineer could independently operate the brakes of the wagon under test without affecting the brakes of the test coach or locomotive which remained under the control of the driver.
A typical slip/brake test train would consist of a locomotive, Test Car 2 and the wagon under test. Class47 locomotives were preferred for the slip/brake testing, not just because they had adequate power to accelerate quickly; also, the responsiveness of the engine control system of the Sulzer locos (compared to the English Electric locos) made it easier for the driver to control the speed more accurately with the short and often light trailing load of a test train.
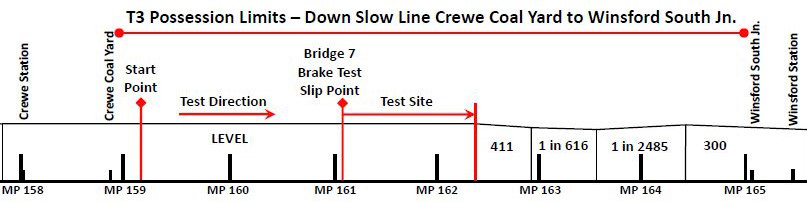
The slip/brake tests were normally carried out on the Down Slow line of the West Coast Main Line between Crewe and Winsford. To ensure safe operation a ‘T3’ possession of the Down Slow line was applied by the Crewe Coal Yard signalman, making sure it was blocked to all traffic and protected by stop boards and detonators at each end of the possession section.
This section of line was particularly suited to the slip/brake testing because the test section was level, and the four-track formation allowed normal traffic to continue on the other three lines whilst testing was in progress.
It was not permitted to carry out slip/brake testing during hours of darkness, thick fog or falling snow and at least 1mile clear visibility was needed before testing could commence; this was because the test engineer had to be able to clearly keep the test vehicle in sight at all times when the vehicle was detached from the test car.
A slip/brake acceptance tests of a wagon would normally be carried out over two days, one for each load condition, so one day for empty and one day for loaded wagon.
Each day would start with test engineers joining the test train at the Derby RTC, a loco would arrive from Derby 4-shed and would transit to Crewe. The train would pause in the station to pick up a Traction Inspector, (and some sandwiches) then continue onto the Down Slow line at Crewe Coal Yard. The T3 possession was then set-up to protect the line, the train brake systems were configured for test and static test checks for correct operation were carried out. These static checks included measurement of brake cylinder application timings and pressures on the wagon under test, and a continuity brake test on the locomotive and test car brakes.
Heavy duty instrument cables were attached from the test car, along the outside of the locomotive and into the leading cab (normally through the drivers’ cab-side window) and connected to twin intercom speaker/microphone outstations. The locomotive was always manned by a driver and a traction inspector for slip/brake testing; this allowed the test engineer to communicate using the intercom directly with the traction inspector in the cab so as not to distract the driver from his duties.
Once the intercom was tested and the static brake tests completed to the satisfaction of the test engineer, the slip coupling was fitted between the test car and the wagon, and testing could commence.
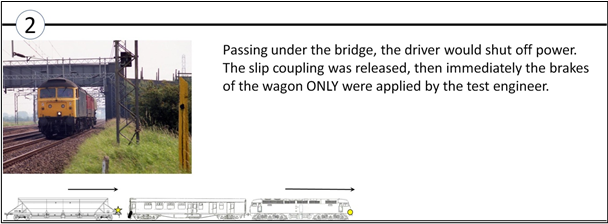
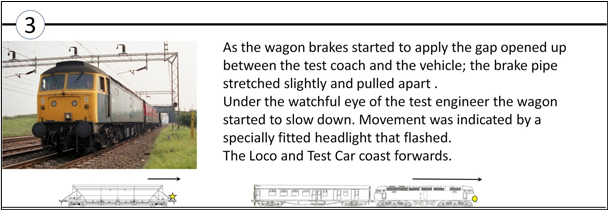
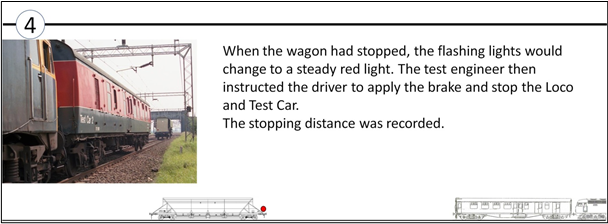
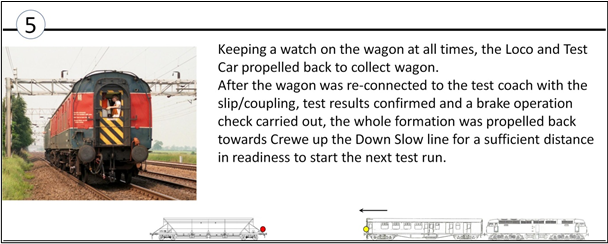
A slip/brake test is described in stages as shown in the diagrams below.
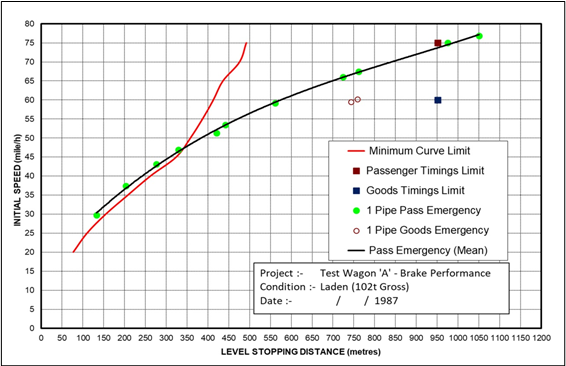
The test engineer calculated the wagon brake stopping distance for each slip/brake test run, taking the total distance from the point at which the brakes were applied on the wagon until the locomotive and test coach had stopped, then subtracting the distance the locomotive and test coach had to reverse back to collect the wagon. The results were plotted on a speed/distance graph.
The stopping distance limit in 1987 for a wagon running at 75 mile/h was 951metres, the graph below shows test results just failing to meet this, therefore this wagon would have been subject to modification to the brake system before a retest.
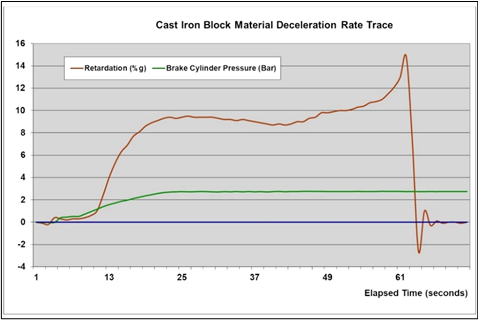
A deceleration meter fitted on the headstock of the wagon containing a calibrated accelerometer and a low pass filtered output onto a strip paper chart provided an accurate measure and characteristic of deceleration rate of the wagon throughout each slip/brake test.
Tests were always carried out at varying speeds from 30 mile/h up to the maximum operating speed of the vehicle under test. On average 15 slip/brake test runs could be completed during a day’s testing, however the achievable number of tests varied depending on how slick the team on board was working, the type of locomotive, the performance of the wagon under test, and more often than not, the weather.
After testing was completed the slip coupling was removed and a standard screw coupling re-attached, the brake system was configured back in the normal manner and the statutory brake continuity test completed before the train was hauled out of the test site. The train would then proceed up to Winsford for a loco run-round before returning via Crewe to the RTC at Derby.
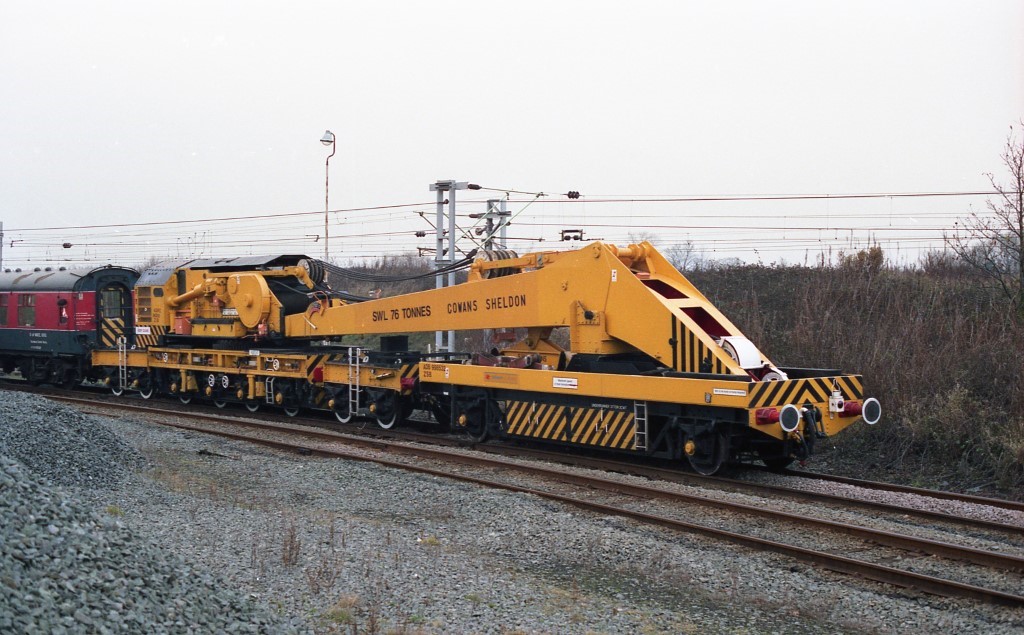
In addition to wagons, on-track plant and coaching stock were occasionally slip/brake tested, for example this Cowans Sheldon 75t breakdown crane needed testing after it was modified by fitting air brakes in 1987.
Due to the fall in wagons requiring testing and UK network access constraints, slip/brake testing on the UK network finished by 2010. Computer modelling and dynamometers offer alternatives to testing now days although this type of testing does continue in mainland Europe and has also been done on private lines. An example were the tests done some years ago at the GCR, albeit without the need for a test coach since the computer took over. The link shows a Youtube video of a GCR slip/brake test run using D123 in July 2009.
Once the GCR is up and running again, keep a look out for events at Quorn when we hope to have Test Car 2 open to visitors again with displays and more information about its history and slip/brake testing.
For those with an appetite for more detail, the full story of Test Car 2’s work during the 1980s and 90s, along with accounts of why and how wagons were tested for acceptance onto British Rail, can be found in Dave Bower’s Rail Vehicle Testing book. ISBN 9781999935603 https://www.bowerbooks.co.uk/
Lastly, we await news from the GCR following the government announcement tomorrow whether we can re-commence working on the fleet again, continuing we’d left off on the Yellow Coach and 2 tank wagons. Either way We’ll be back with another feature, or hopefully an update. See you then.
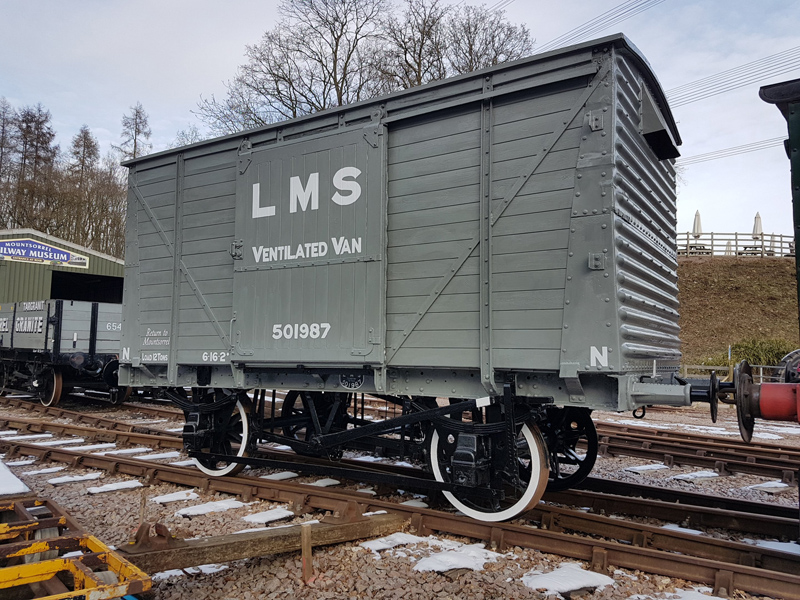
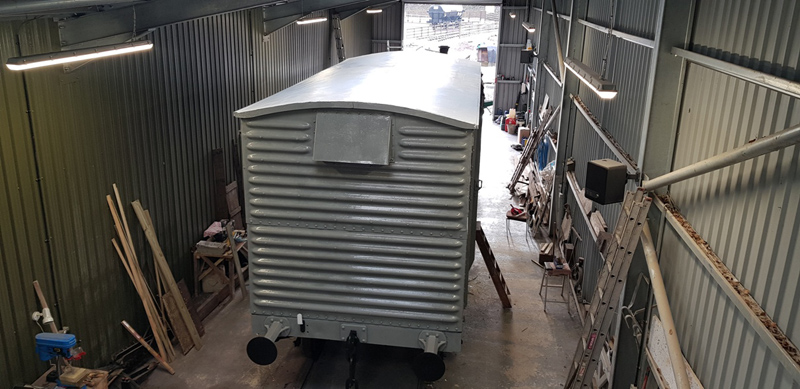
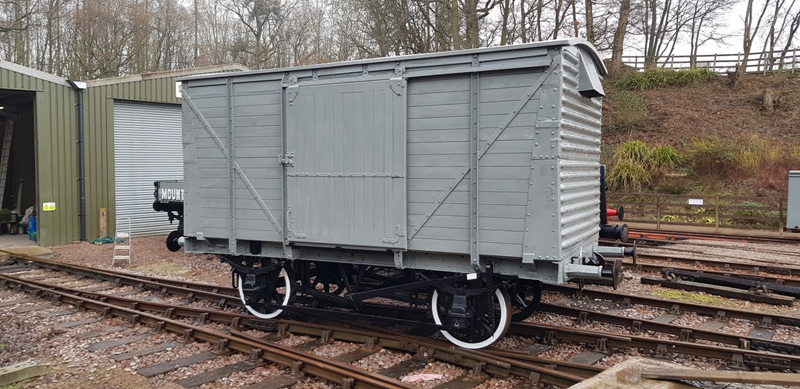
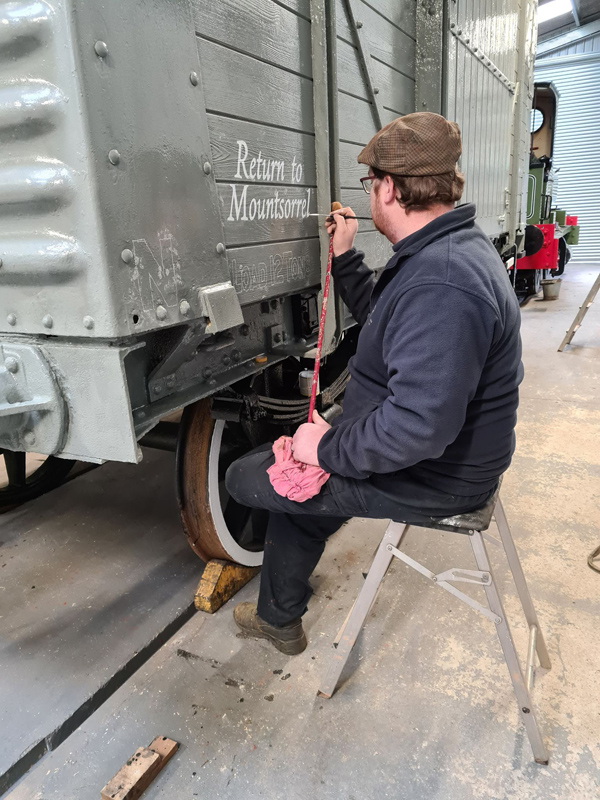
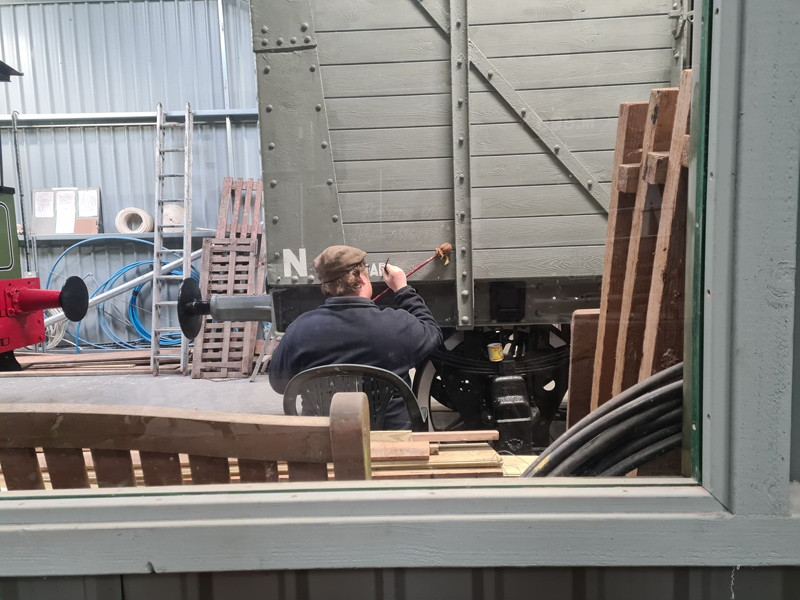
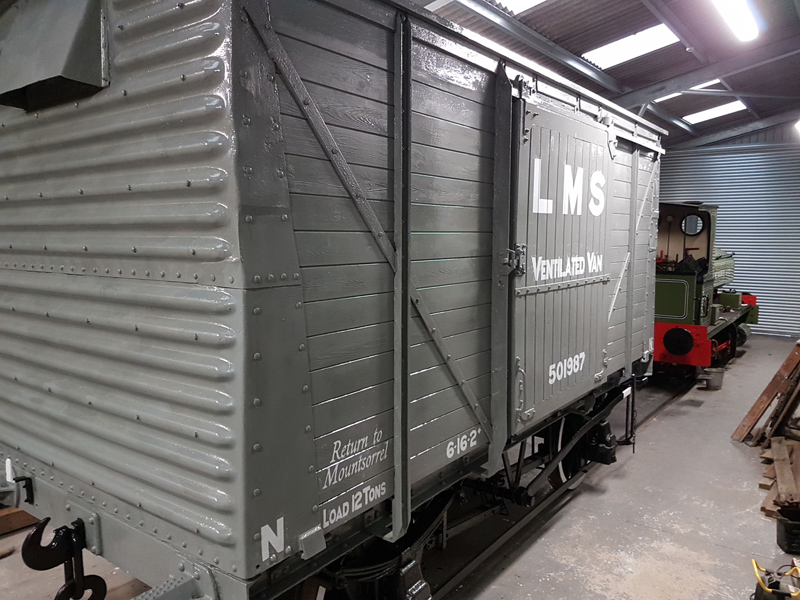
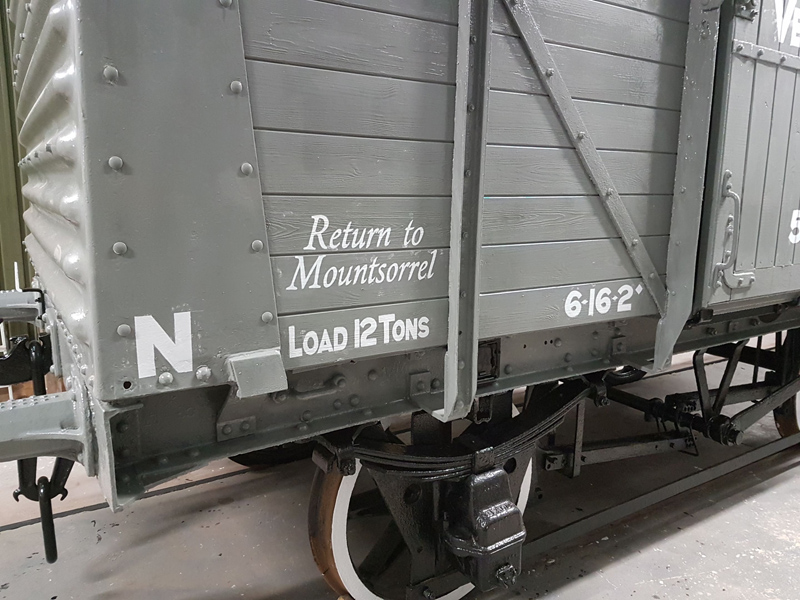
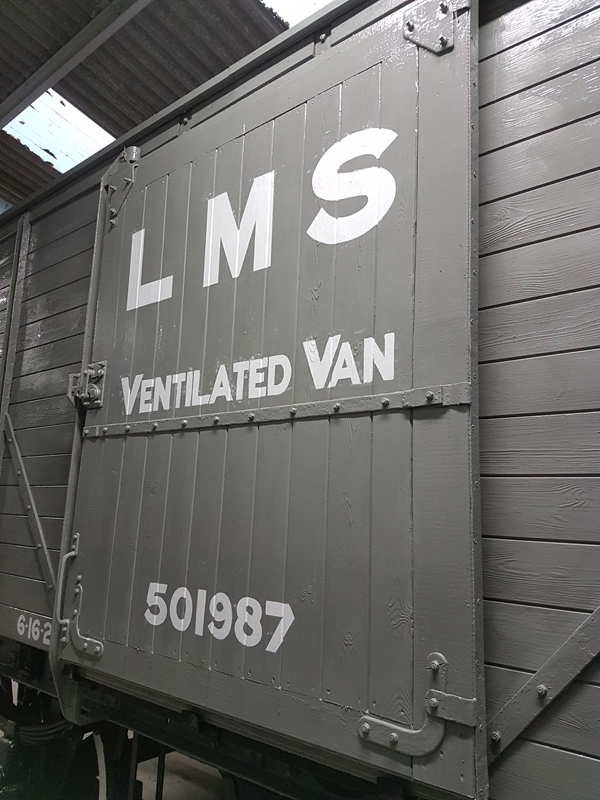
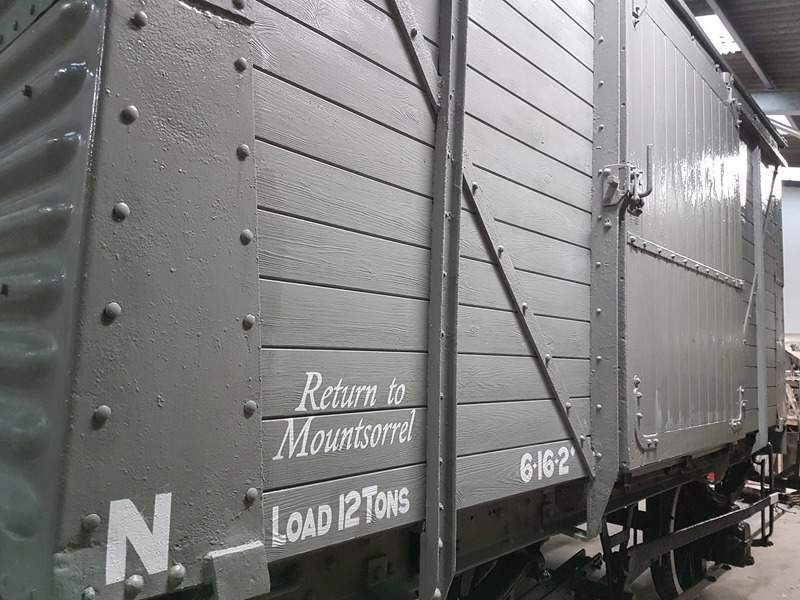
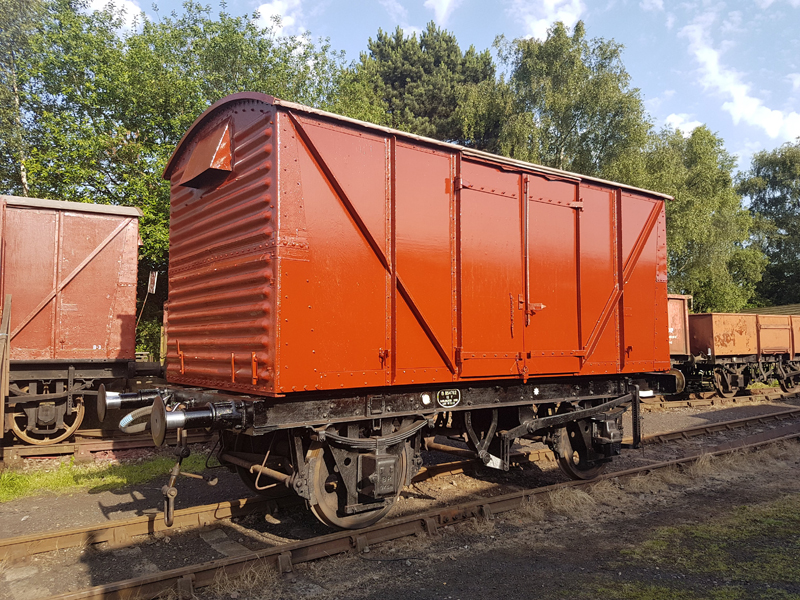
This week’s feature again starts with a small update: Matt returned to Mountsorrel to complete their LMS 12T van, mainly the east side door and the solebar ‘D’ Plates which completed the van.
The van was drawn outside by Mountsorrel’s resident Ruston, so the livery could be seen outside for the first time.
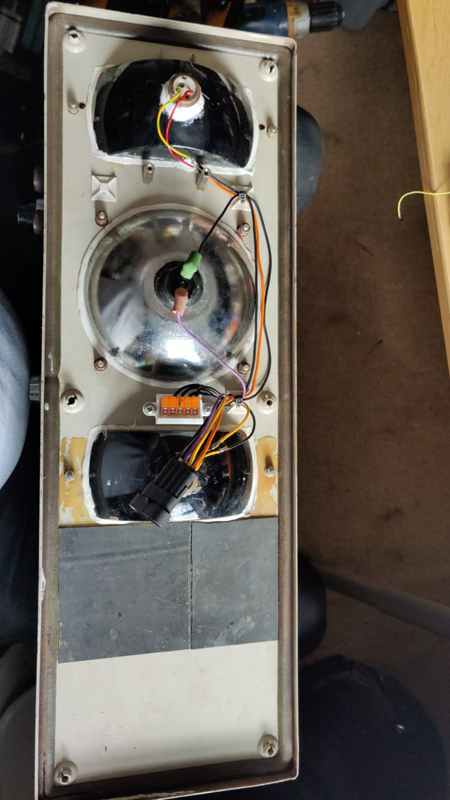
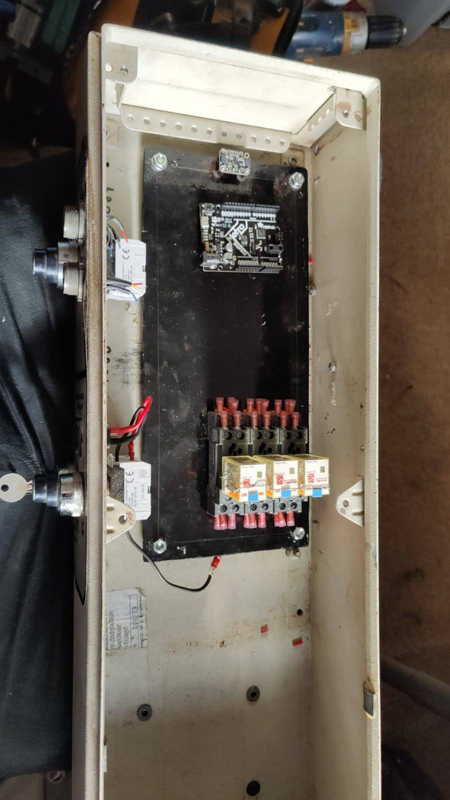
I have been continuing to make progress on the Slip Lamp for Test Car 2. All components have now arrived, so I can now focus on final mountings for all components and then wiring. As Matt said last week, we will have this on show as and when we can open the Test Car to the public again.
This week’s feature is a bit of a sideways step from the wagons, but is all about the road/site vehicles that support our endeavours restoring our wagons. The first to mention is our one-ton site dumper, Danny.
Not a lot is known for Danny’s history, but it was built by Winget around 1976. The dumper was registered in 1976 with the registration number PUT 666R. Danny is a Winget 3SE, and was in use by a local scout campsite before Nick became the owner. The powerplant is a Petter PH1, producing an enormous 9hp running to the front axle through a 3 speed manual transmission, a layout in common with many of the other site dumpers of the period. We use Danny for trumdling items around Quorn Yard and for the skip run when required. Danny can also pull a fleet of trailers we have, which added to Danny’s carrying ability.
We have begun to do some work on Danny, starting with having the steering box rebuilt. With the rebuilt box Danny was properly mobile again, so it was decided to paint Danny into a scheme representative of its current location. This started last year, but got postponed due to the decreasing temperatures.
The next vehicle is the Volvo BM L70 Loading Shovel, bought by the railway for the P’Way department to replace an even older Volvo Loading Shovel (still very muich missed from my point of view). The P’Way department now use a Telehandler, so we have sole use of the Volvo which we use to remove vacuum cylinders and generally lift and shift items around the yard.
There is a little work outstanding on the Volvo, mainly on the exhaust system. A new silencer is required and the relvant pipes to connect it to the turbo outlet. If anyone knows where we might get a suitable exhaust silencer for this, please do get in touch! Once the exhaust is done, we’d like to give it a spruce up.
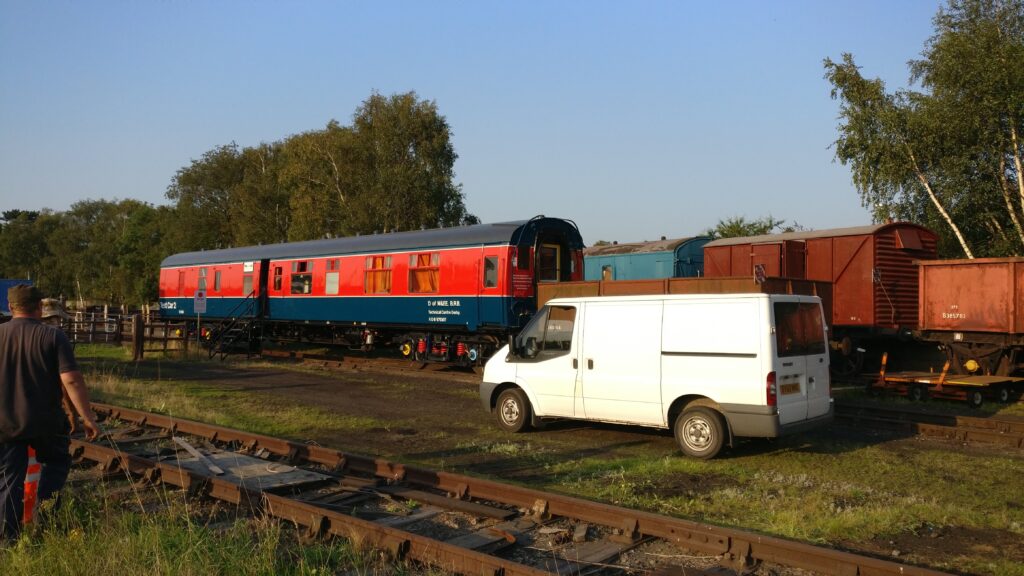
Lastly, the one vehicle I would be remiss not to mention would be Nick’s daily driver, the humble Transit Van. Without the van, we’d not be able to move anything between the sites without the relative ease that we have or have the ability to collect wood from timber merchants and keep it dry or any other tasks like that. A very useful vehicle indeed.
When we are able to return to the railway, we will look to progress these vehicles alongside the rest of the wagon fleet.
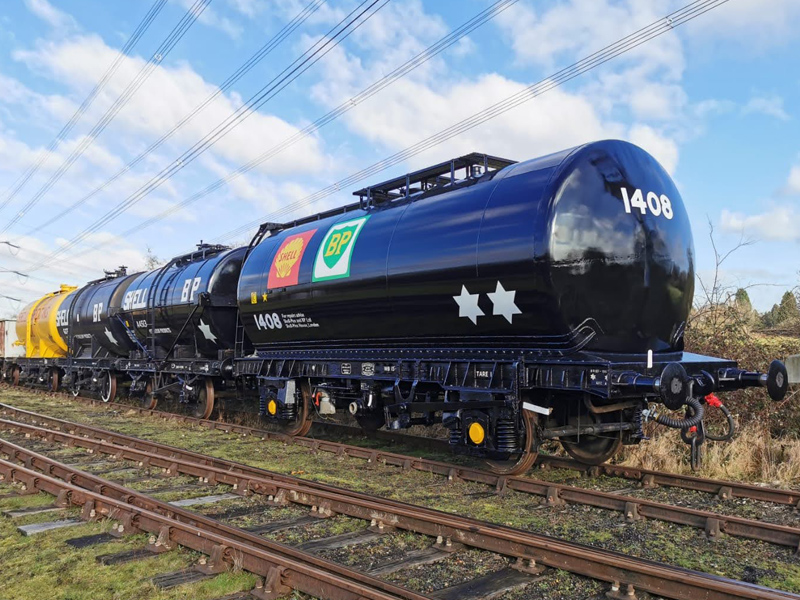
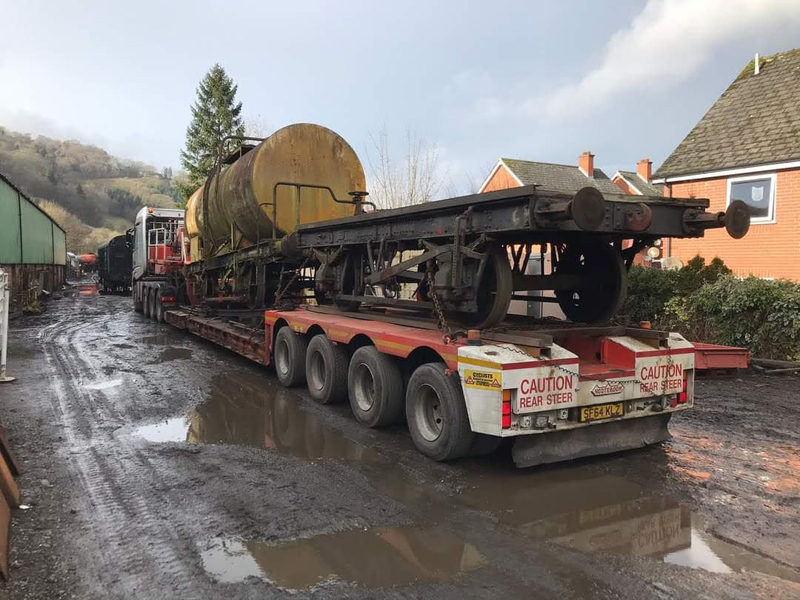
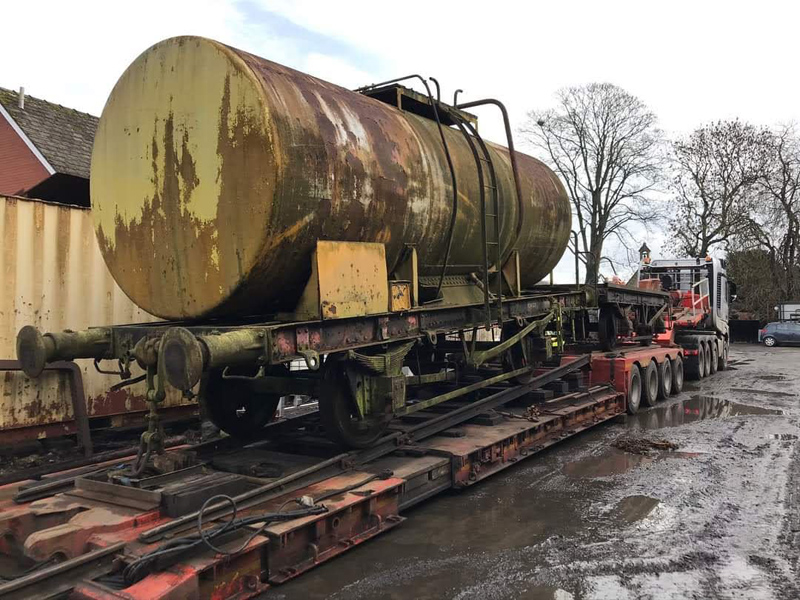
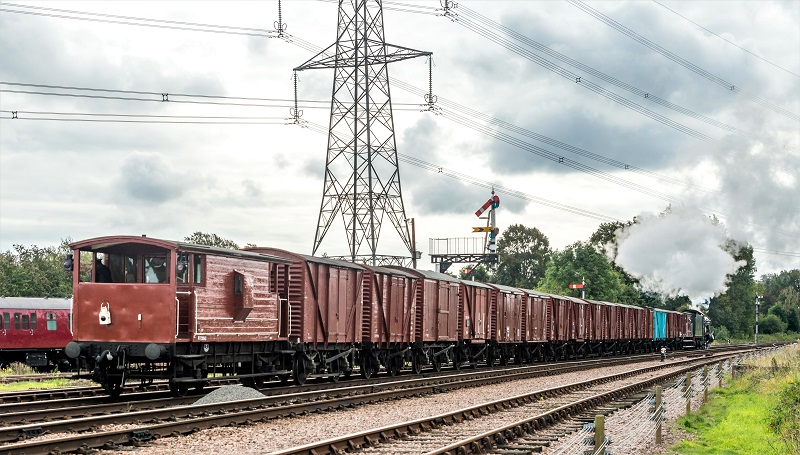
Our feature image above shows the beginnings of our tanker train with 1408 joining the rake this week after being shunted from Rothley by the Operations department. Before I get into the bulk of this feature, in fact if we are honest this is an update, Monday saw the arrival of 2 vehicles from the Llangollen Railway. Ferry tank B749677 Diagram 1/305 built to Lot 2429 in 1952 at Ashford. Once complete this will of course join the fledgling tanker train, as it stands we are considering restoring it into Traffic Services Ltd Black livery as number 500817 The other vehicle a chassis, this being former Shell Mex and BP Ltd tank 6463 and will receive a van body but I’ll leave it at that for the moment.
Images courtesy of Andy Maxwell
Next I managed to get my brushes out. The Rothley and Mountsorrel Heritage Centre have been pressing forward with the restoration of an LMS 12T van. They have been following Government guidelines that class volunteers of charitable organisations as essential workers, so Michelle and I were allowed on site to progress the vehicle.
Images courtesy of Steve Cramp
Working in isolation, with other volunteers on site restricted entry to the workshop I gradually applied the livery. This being a slightly earlier style than what would have been applied to the vehicle but this fulfils the owners brief and adds further interest to the centres fleet.
One side complete, all but the door on the other and the sole bar plates backed. It was nice to get out at a weekend especially for my wife who has been furloughed since September and like most has been struggling at home alone whilst I’m at work.
Not just myself working however, Ross has been looking into the Test Cars slip lamp, manufacturing new internal electronics replacing the life expired originals. The lamp displays flashing white lamps when the slip test vehicle is moving and a steady red when stopped, there is also a test button and for our purposes a demonstration mode to enhance our tours of the Test Car when we are allowed to open again.
So now on to the feature.
Sometimes we are asked “Why do you spend almost all of your spare time restoring wagons?” Why indeed? Although the following was written sometime ago for an unpublished article, its intent remains.
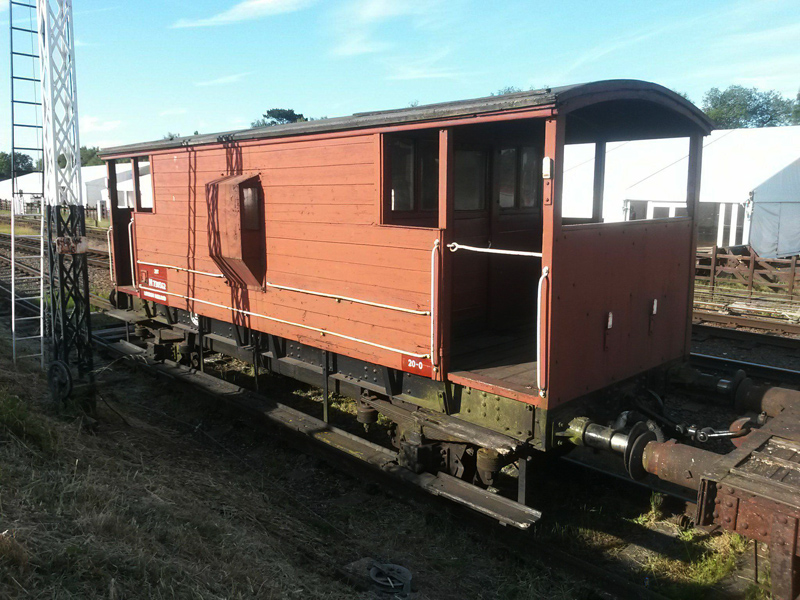
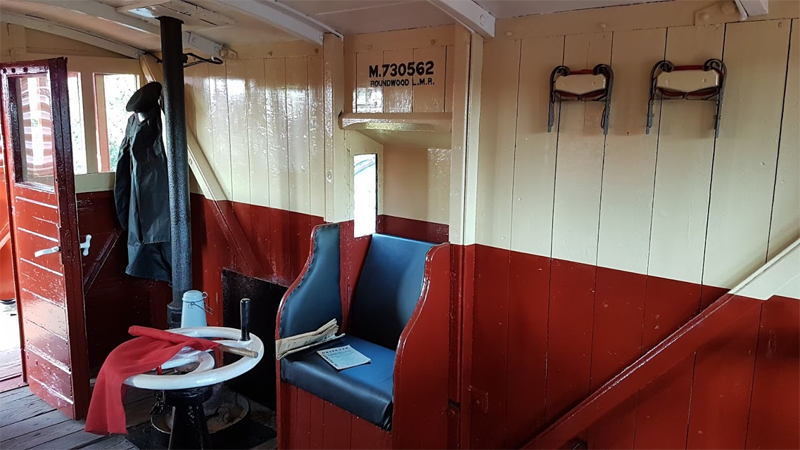
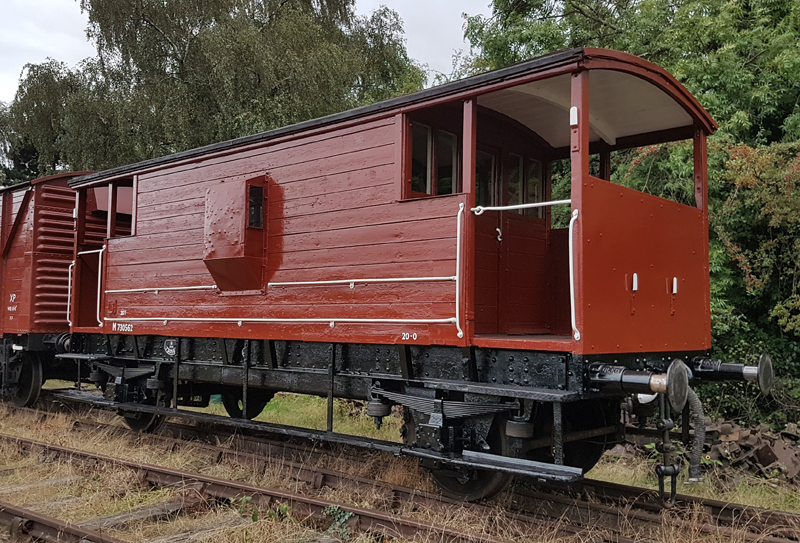
Visiting the GCR’s 2018 Model Rail Event from Surry, Mr Robert Holah noticed in the lie-by siding at Quorn our London Midland Scottish Railway (LMSR) Brakevan M730562.
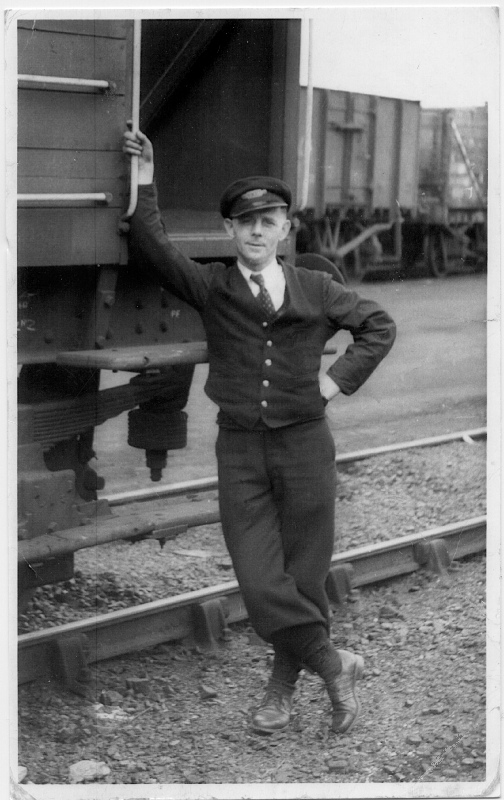
What brought this particular vehicle to his attention was its similarity to one pictured in an image of his father.
Allbert Edward Holah was a Goods Guard, initially with the LMSR and then British Railways London Midland Region upon nationalisation of the railways in 1948. He was based at Harrow and Wealdstone station. In fact he was at the Station on the 8th October 1952. It was a foggy morning and the 07:31 Tring – Euston local train was stood in Platform 4. At 08:19 this train was struck by the Southbound Perth – Euston Express, the resulting wreckage was then hit by the Northbound Euston – Liverpool Express on the adjacent line. 112 were killed and 340 injured and it remains the worse peace time rail accident in the UK and basically resulted in the nationwide introduction of the Automatic Warning System (AWS). The incident affected Albert quite deeply.
Albert later became an instructor and as such trained a number of immigrants from the Caribbean, what has now become known as the Windrush Generation, he opened his home to a young Caribbean Gentlemen during Christmas who’s family remained at home in Jamaica. Robert remembers this well and Mrs Holah’s annoyance of not being informed of his farthers guest and being unable to fully prepare.
Unfortunately Albert’s colleagues were not as charitable and saw the immigrants as a threat, taking their jobs. As a punishment the union forced Albert to Coventry and ordered his colleagues not to communicate with him. This of cause affected Albert even further and in 1959, 18 Months after being moved, he suffered a heart attack and died. Robert at the age of 12 was left with an image and memories.
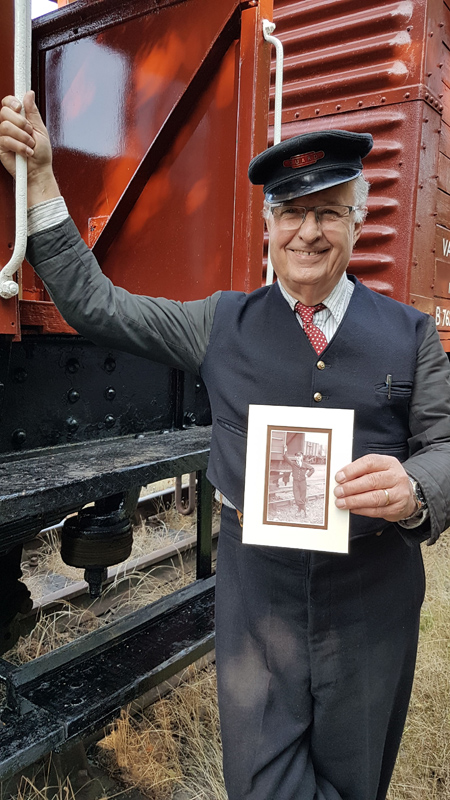
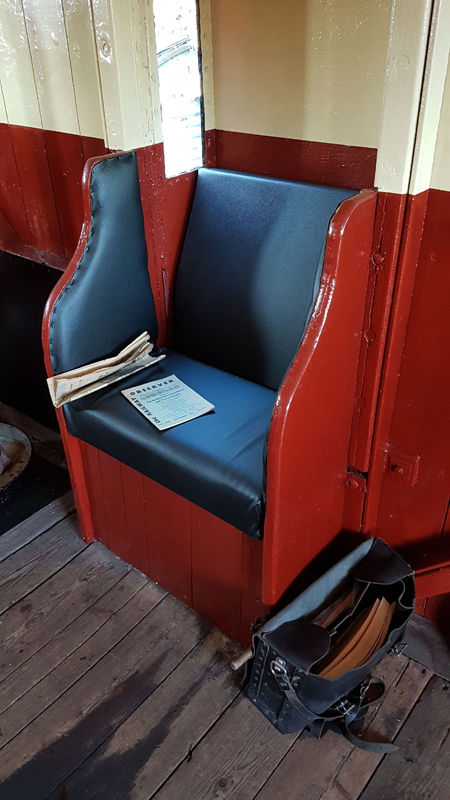
After an email to the GCR and being forwarded on to us at “Quorn Wagon and Wagon”. Robert came and visited on the 1st September 2018. We had spent a number of weeks repairing and carrying out a full interior and exterior repaint to M730562. We also added extra items that Roberts farther would have instantly remembered. Guards Bag, Tea Can, Paperwork, Newspaper, Railway Observer, Lamps, Shunters pole, Brake Stick along with other items. We also lent Robert a BR uniform identical to his fathers including the Midland Region Staff association tie he is wearing in the photograph. This allowed Robert to recreate the image of his farther. The artifacts in the vehicle brought back a number of further memories for Robert, playing with his father’s handlamp rotating the handle between Red, Green and Clear. His father sat fettling a wooden implement one end square the other round. With that description we handed Robert a Brake Stick and demonstrated its use as well as the use of a Shunters Pole.
We continue to extend our thanks to Robert for coming down and sharing his memories. We know he enjoyed his visit and will be coming back to see us soon. So why do we restore Goods Wagons? A tangible link to the past, maybe not directly for us but certainly for others, as was the case for Robert. It may never be proven but we like to think that Albert may have worked M730562 at least once in his career. Goods vehicles are an important part of railway history it’s the reason the railways were built. To recreate the sights and sounds of a bygone railway then they are an essential part of the scene and a draw for our visitors, not just the ones we care for but all those none passenger vehicles at all Heritage Railways across the country.
Without a doubt our vehicles are most visible when they are either static in sidings or operating at Galas or during Photocharters.
But recreating bygone sites and sounds is not the sole purpose of our fleet. The first group of vehicles continuing to do the work they were built for are the Ballast hoppers. Centre line Catfish and Sholder and Centre line Dogfish. There purpose to transport and dispense ballast were required.
The most notable case being the recent laying of the Mountsorrel branch, after the hard work by the volunteers to remove the vegetation, prepare the ground, lay the first layers of ballast and of course the track, the ballast wagons were brought into stabilise the permanent way.
We extend our thanks to Steve Cramp and the volunteers of the Mountsorrel Railway for providing these images as well as capturing the videos below which also include a Ballast Plough in operation, although not a member of our fleet it is also vital to the work being carried out.
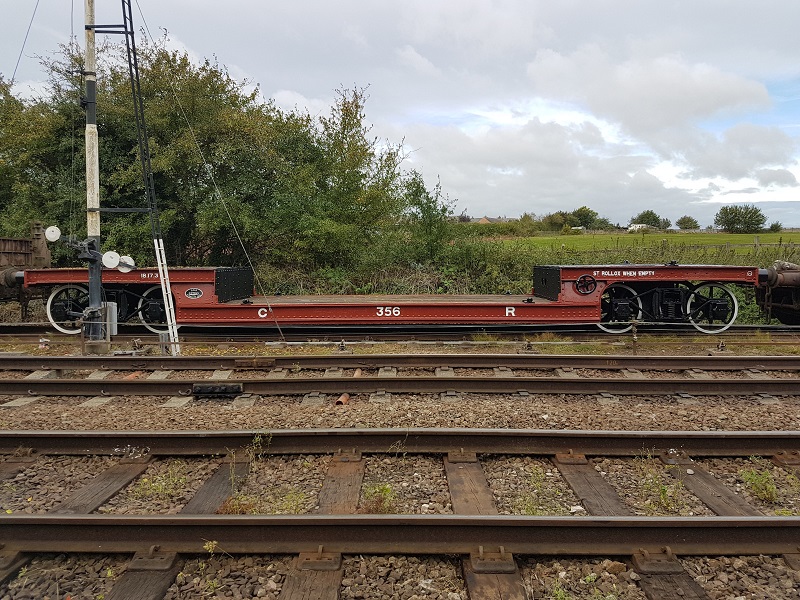
Above I mentioned the rail being laid but how did this get moved to site? Well that’s were our next group of vehicles comes in to it, the flats, as the rail head moved forward, wagons carrying rail would drop it of, this would then be moved by hand a length at a time and the Mountsorrels Wickham trolley would follow keeping the rail no more that a length behind the rail head. Then another bulk load would be dropped off and the process continue.
Keeping with the flats we look at bridge repairs, the most recent replacement of Bridge 341 and repairs to Bridge 350. With flats being used to carry brick work for the bridge in the case of 341 and the floating pontoons for Bridge 350.
As well as Bridges, Canopies also require flat wagons. Specifically the repairs to Loughborough’s Canopy. The Tank flat was used to carry the main canopy structures from and to the work site as well as the single bolster used not only to remove materials but as a means to reduce the amount of scaffolding required to conduct the task.
With the wheel base of our examples reducing we turn to the ballast opens namely the Grampus and Rudd wagons. These are basically the railways general utility vehicles used to fetch and carry anything and everything. Ranging from ash to sleepers, spoil to vegetation.
Another popular vehicle is the Caledonian Weltrol, at one point labelled the single most active vehicle on the railway. With a long spell of use with the S&T department running out cable the full length of the railway. At this present moment it stands in Quorn yard with the tender tank from a certain GWR Castle class locomotive upon it, stored awaiting fitment to its chassis.
Staying with locomotives, both of the road and rail variety we have two vehicles used to store water. 1408 being the primary water source for filling locomotives at Swithland and A4513 having been used for traction engines at Quorn.
The list of work carried out by these vehicles can continue and this can of course include Film and TV work which would create its own long list of appearances. But I hope this gives a little insight in to those aging departmental vehicles that don’t really appear to do anything but occupy sidings. As we get closer to the completion of the gap these wagons will once again be called upon to carry out there vital work and once that and any possible doubling of the track to Leicester is carried out they will still be ready for the next set of bridge repairs or bank slip or major civil project the GCR wish to use them for.
But wait I have forgotten 4 vital vehicles in our fleet, every time they move they are conducting the work they were built for and appear in a few of our images. They are used for their original purpose even when part of a demonstration train. I am talking none other than the focus of our last feature.
We do have plans to work on our departmental fleet and return them to their Black and Straw lettered livery but after we have completed the more vulnerable freight vehicles, They will however continue there work and be available for any engineering needs, after all there is a sense of authenticity in a rake of rusty and battered wagons going about there business.
We also wish to thank the GCR for supplying images for this feature and credit to those photographers who captured our vehicles at work. David Howdle for the vehicles atop bridge 350 unloading pontoons Graham Wignall for Rails being unloaded behind 47406 & Track ballasting from a Grampus at Swithland Sidings Tony Sparks for Loughborough Canopy work images.
I though it best to give both Matt and Ross a break this weekend, so for the first time its me, Dave Bower, completing a weekly update, this week we focus on the van at the back of the train.
As early as the 1840s wagons or coaches were specifically adapted for a Guard, this was someone employed by the railway to protect the valuable stock carried by the train from theft or vandalism. As these ‘unfitted’ trains (vehicles not fitted with an automatic brake controlled by the locomotive) increased speed and weight the Guards took on more duties relating to the actual safe running of the train. By the 1870s what we now know as ‘brake vans’ were in use and in the case of goods trains meant the Guard was on hand to take action in the event of a breakdown, accident or the more common event of train separation. As the speed of goods trains still continued to increased the purpose of the brake van and the guard’s duties developed further with the Guard using the brake van’s handbrake to assist with keeping the train under control on downwards gradients or whenever he could see that the locomotive’s crew was attempting to slow the train. The Guard could also use the handbrake to keep the loose couplings taut between unfitted wagons minimising the risk of broken couplings and if no locomotive was attached hold the train with the brake vans brake.
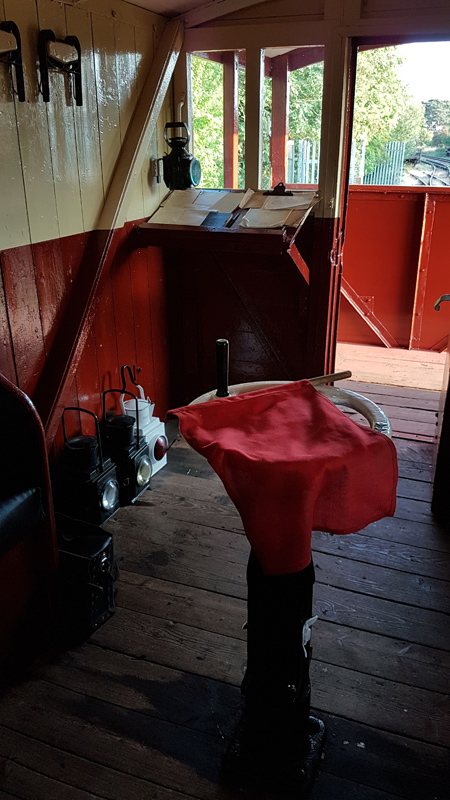
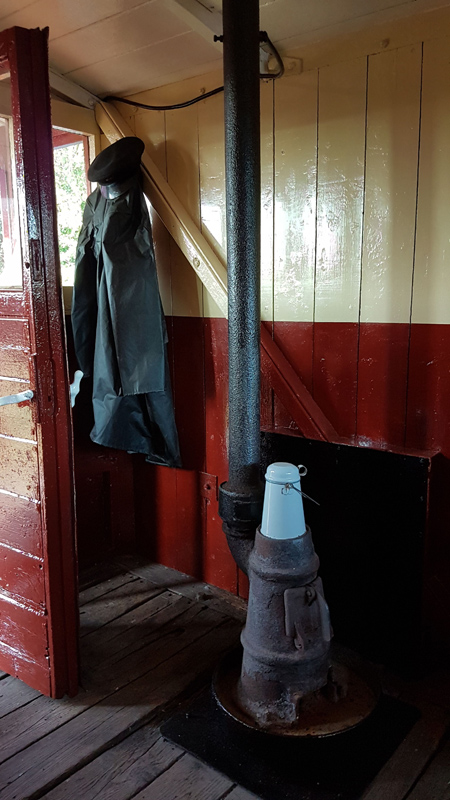
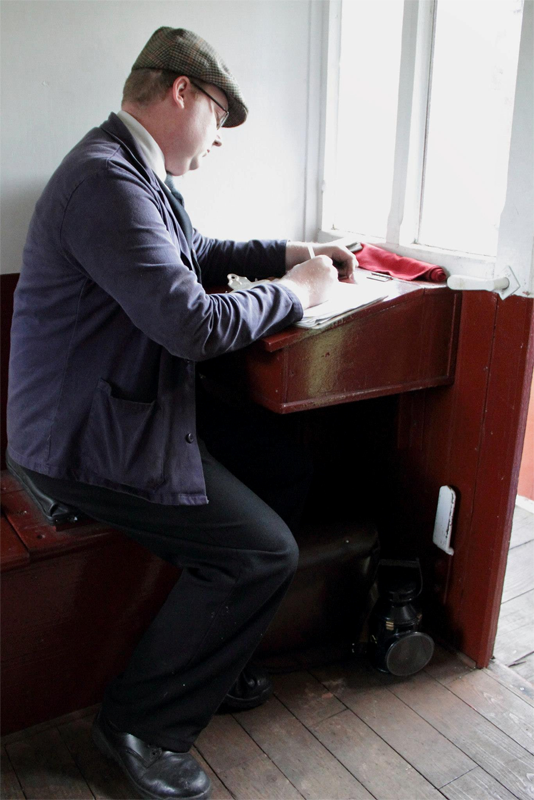
Different types of brake vans evolved, some with single verandas and others with a veranda at each end, normally with a safety bar or half height door to each side. In most cases a significant amount of ballast is installed in the form of steel, cast iron, water tanks or more commonly during and after the wars concrete, this was built into the underframe to increase the available braking effort applied by the van. Step boards are fitted, sometimes along the full length of the van along with multiple grab handrails for the use of the Guard or Shunter when required. Inside the van’s interior most are fitted with a coal stove for the guard’s heating and cooking needs, with a hanging rail above with hooks on for drying wet clothing. As well as a desk to complete the all important paperwork required by the company.
Most brake vans were not built with train brakes, only a wheel operated handbrake; because they were designed to be used at the rear of un-fitted trains. Some are however vacuum through-pipe fitted, in which case a brake application valve is installed inside the brake van but towards the end of brake van use between the late 60s and 80s vacuum and even air brakes were fitted.
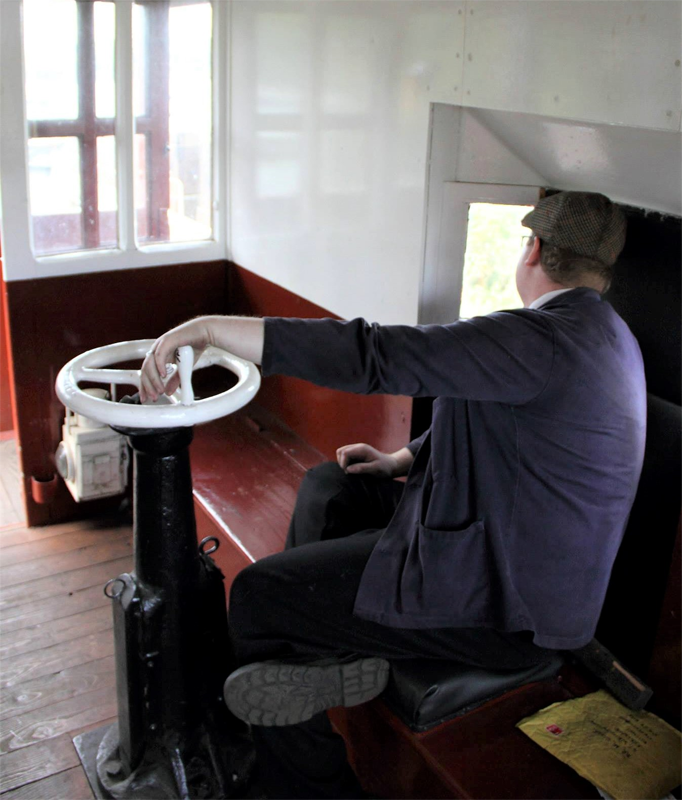
Duckets on each side of the brake van provide the guard with safe viewing of the train , signals ahead and the lineside without the need for leaning out of the brake van. The seats by each ducket also have side and back pads which provide the guard with some useful support in the event of jerks or coupling snatches. The handbrake wheel is installed within easy reach of the guards ducket seats.
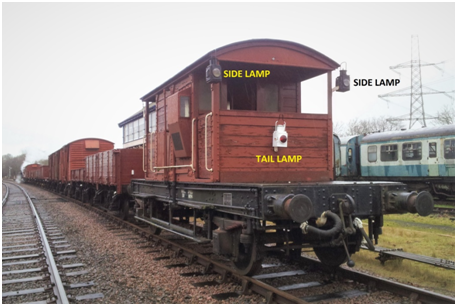
Lamp irons are fitted to carry a tail-lamp and also side lamps. It was the guard’s duty to check that the tail and side lamps were on-board, filled with paraffin, the wick trimmed.
Trains that are not fitted with the automatic brake throughout, i.e. unfitted, must in addition to the tail lamp carry side lamps. With one exception, it is not a requirement to display side lamps on freights when the automatic brake is connected and in use on all vehicles on the train. This was a LNER / BR Eastern rule and later adopted by all of BR in the 1980s
Side lamps are required to be lit at all times. They are designed to show a white aspect towards the locomotive to inform the crew that the train is still complete and following. if however the lamps were unlit, a red aspect could be shown via light shining through the rear red filter. This could be misread by the crew as a stop signal. In a genuine emergency the Guard would rapidly apply and release the hand brake, jerking the train to grab the crews attention and display a separate red flag or light. If the train was fitted with a brake pipe the full length of the train, then all the Guard needed to do was release the vacuum or apply the air brake.
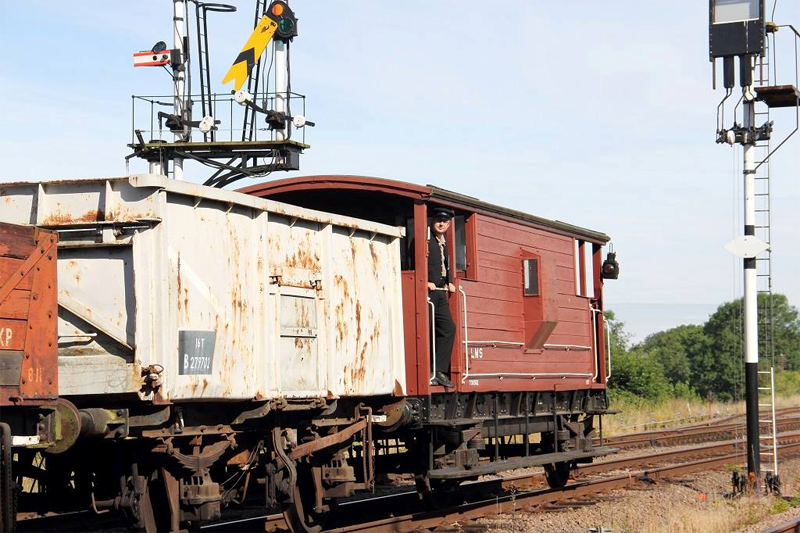
To the rear two red side lamps are displayed for trains operating on main or single lines.
or, one red light on the side furthest from the main line and one white light nearest for trains in loops adjoining main lines and running in the same direction. This also applies on double lines signalled for trains in both directions whilst travelling in the reverse direction.
Side lamps should be removed when in sidings.
There is a story of an express trains crew leaping from the foot plate of a loco when the Guard of a goods forgot to swap his mainline side lamp for a white. Reputedly a down express came through Loughborough Central and saw in the distance beyond Empress Road bridge the 3 red tail lamps of a goods, the driver applied the brakes and both he and the fireman leapt from the cab. The driver received cuts and bruises the fireman however hit the bridge and was killed. The Goods was in the Down Goods loop clear of the express waiting to pass. How true the story is regards to location I cannot verify but I’m sure it is likely to have happened even if the outcome did not involve a fatality.
The Guards preparation duties include checking that all the necessary equipment was in the brake van.
A shunting pole which is a wooden pole about 6 feet long with a twisted hook on the end, this is used to couple couplings without the guard having to climb between the wagons,
A brake stick, used to lever down the handbrakes of wagons,
Two pairs of track circuit clips, for use in emergency situations to indicate to the signalman that a train is occupying that section. They are clipped over both rails of a track-circuited line so as to short circuit the track in the event of an incident or accident,
A spare vacuum hose,
Wheel scotches (minimum 2),
Fire extinguisher and fire bucket,
Side Lamps (x 2),
Tail Lamp,
Red and Green flags,
Paraffin for the lamps,
Coal and kindling to light the stove fire.
Other uses of brake vans includes those fitted with ballast ploughs under each end, that are used to assist with distribution of ballast and clearing the rails during ballast drop runs when at the rear of a train of bottom discharge ballast wagons such as Dogfish or Catfish type wagons.
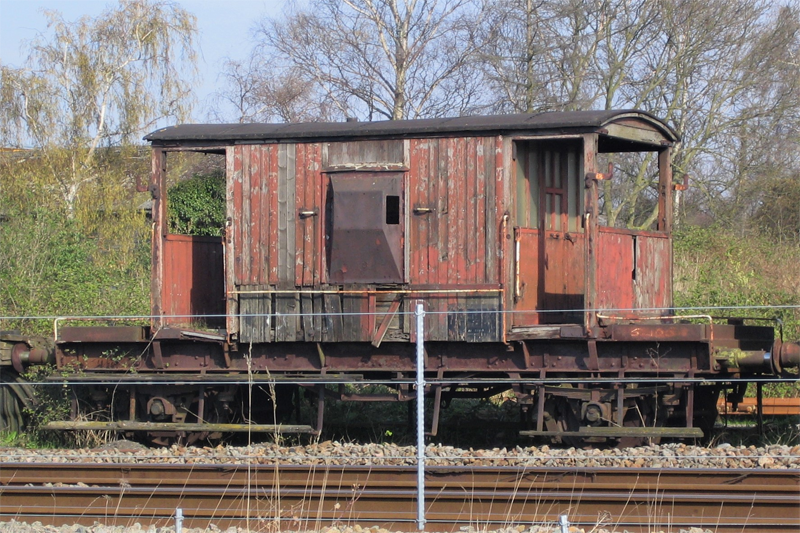
As the running of unfitted trains dropped during the 1970s and finished in the early 1980s, many brake vans were withdrawn, shunted to the end of sidings and left to rot because they were filled with concrete so had to be dealt with differently when it came to scrapping. This probably helped provide more of a choice for the preservationists. Nick has regaled us with stories of brake vans being worked from scrap yard to scrap yard as none were too keen to break up the vehicles as they were mostly concrete and wood.
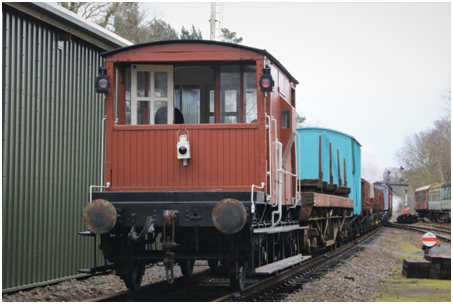
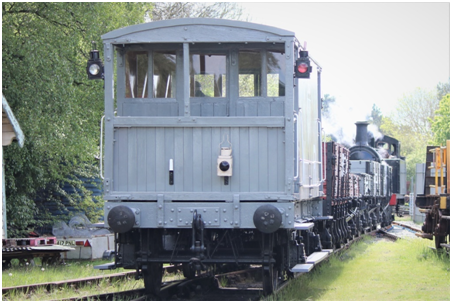
In the Quorn Wagon & Wagon fleet we are lucky to have four brake vans, all of which have been restored for use at the GCR. In each case, in addition to the replacement of various sections of the bodywork, the restoration by the team has involved corrosion removal, applying rust prevention and wood preservatives, brake equipment overhaul, axle bearing maintenance, full internal refurbishment, stoves, new upholstery and painting, underframe scraping, full external repaint and sign writing.
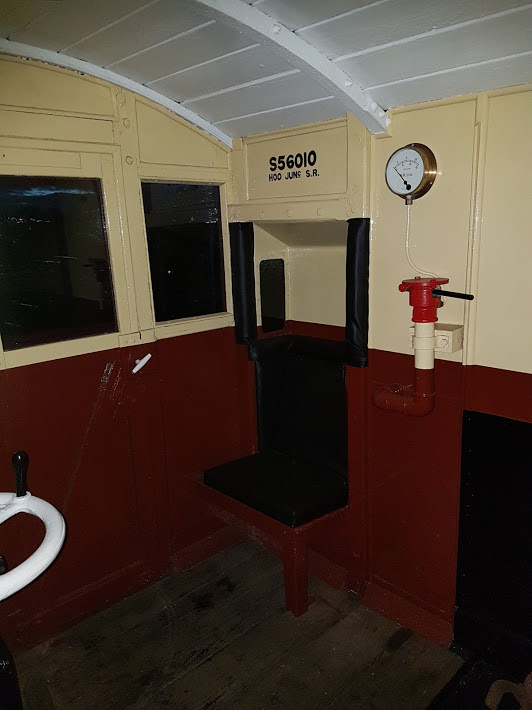
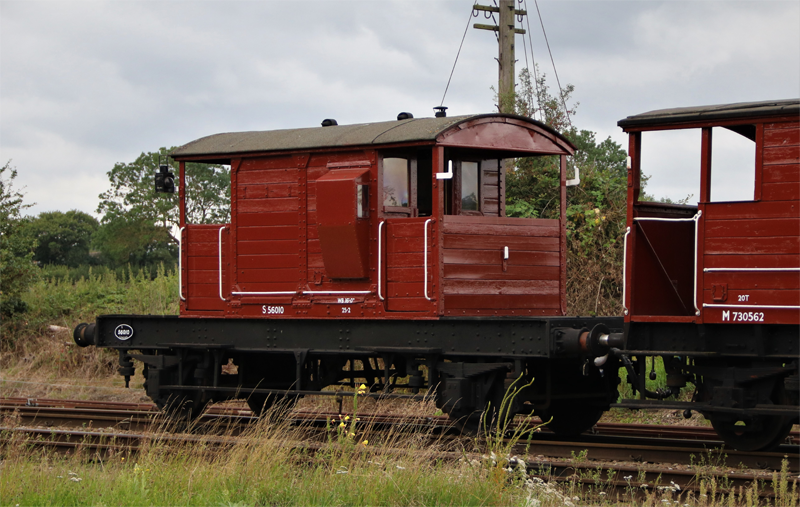
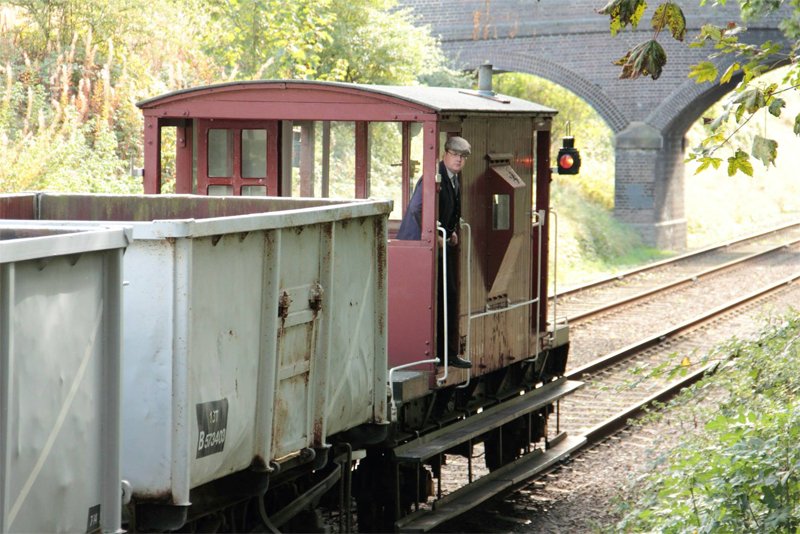
Our oldest is S56010 a Southern 25T, 16ft wheelbase ‘Pilbox’ Brake built at the former London Brighton & South Coast Railway works at Lancing in 1930 to Lot No.3033, restored in 2018 including the complete replacement of one veranda and external timberwork, door planks and windows, stove re-built and stovepipe.
Next in order of age is M730562 an LMS 20T, 16ft wheelbase Brake built in Derby 1938, Lot No.1104, also restored in 2018, including the complete replacement of external timberwork.
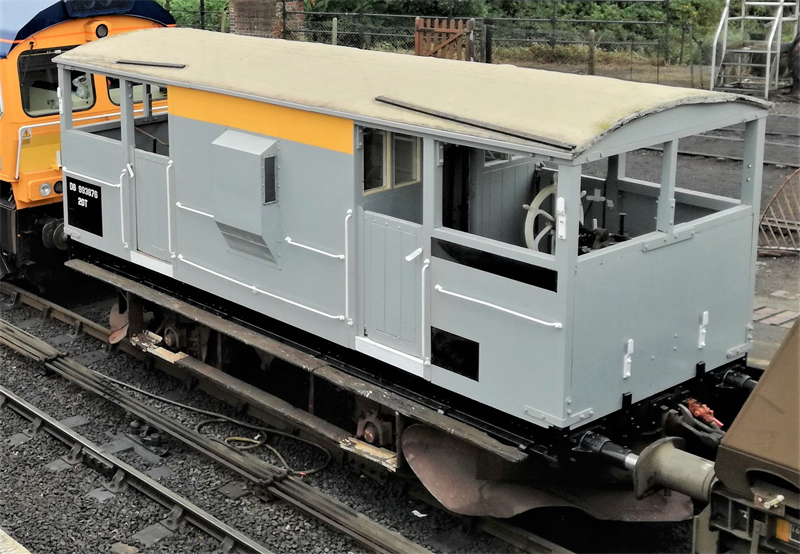
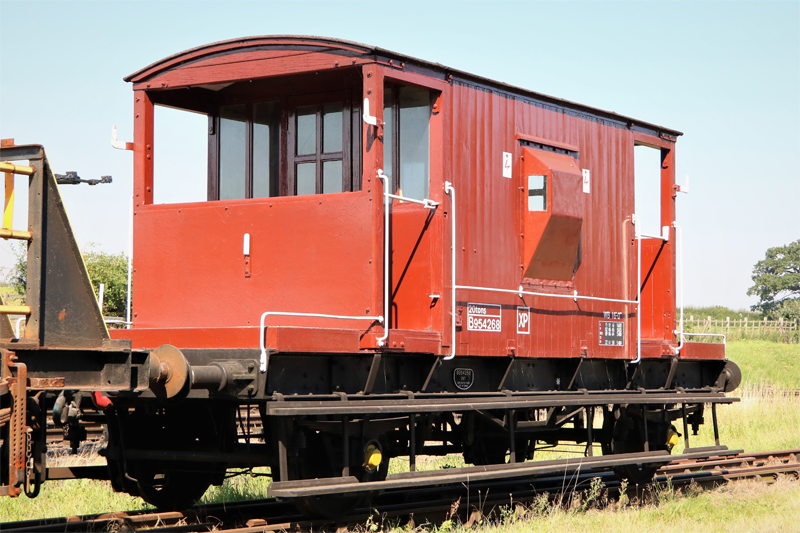
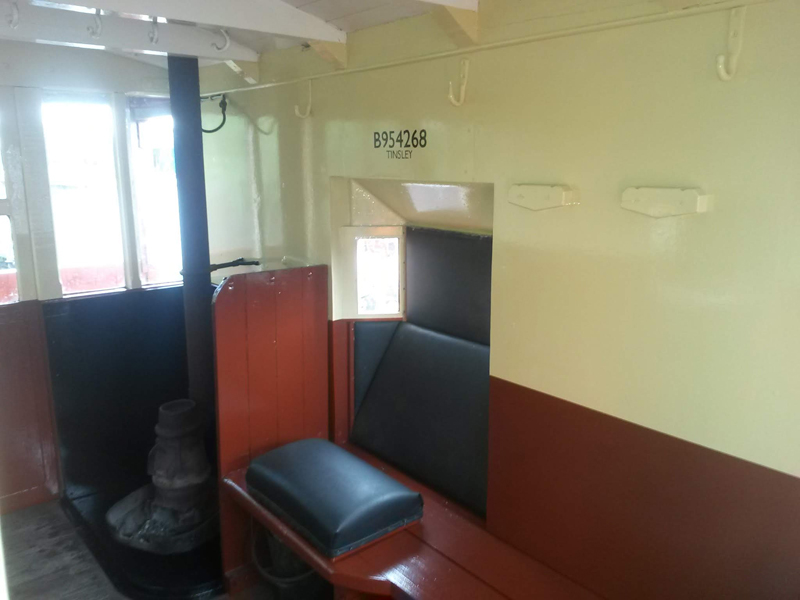
Then we have B954268 a BR 20T, 16ft wheelbase Brake built in Darlington 1958, Lot No.3129, restored 2018 including replacement of a significant amount of external and veranda timberwork, however currently out of traffic due to wheelset damage.
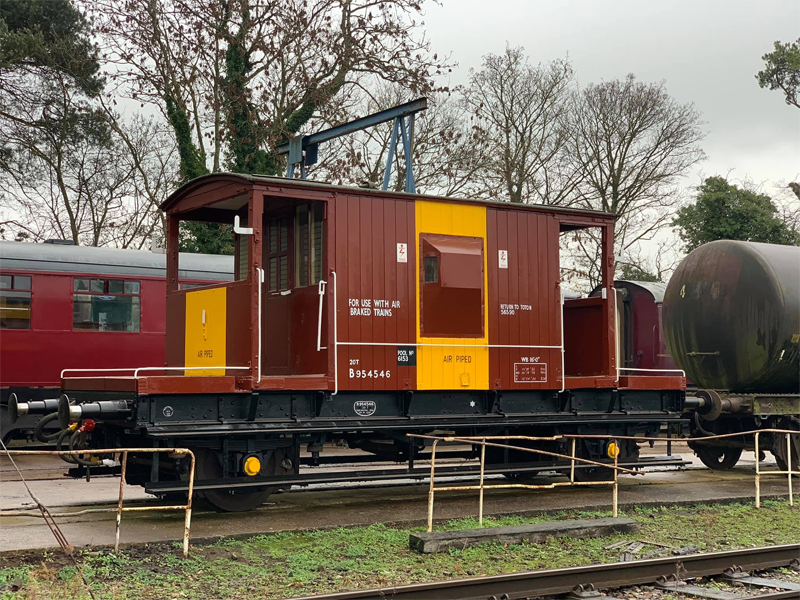
Finally our youngest B954546 a BR 20T, 16ft wheelbase Brake built in Darlington 1959, Lot No. 3227, restored last year after 8 years out of use, work included timberwork replacement to the verandas although brake rigging work remains
Operationally at the GCR a brake van is marshalled at each end of goods trains, this is to assist with more timely changes of direction at each end of the line, which ensures that our brake vans are used regularly, but does mean that we have to keep on-top of the operational wear and tear.
Matt of course, and as some of our images show, did use to operate these vehicles during his tenure with the operations department, his biggest sense of helplessness was the dreaded sound of couplings rapidly tightening as the crew were a little exuberant with the regulator. With up to twenty vehicles and a foot of slack between each, whatever speed the loco has achieved in that 20ft is instantly applied to the brake van as the last coupling tightens, on a number of occasions he recalls bracing himself between duckets or grasping the brake standard as the inevitable approached, but as he confirms it is all part of the fun.
Next week we shall take a broad look at our departmental vehicles and the work they undertake on the modern day Great Central Railway, not all of our vehicles are used to demonstrate what they once did some still actually do the work they were built for and more.
Feature image courtesy of Clive Hanley Over the past 4 years we have been steadily increase our van train. We have a number of possible opportunities to reach our target of 20. Although the overall plan is a fixed rake of 17 with 3 spare to operate within the Mixed freight or to bolster the main rake during charters. The total is currently 15 so we are 5 short. Although this can be fuddled with the use of the Fish Van and Container carrying vehicles. The past 2 years have seen us refresh a number of other “mixed” vehicles but the latest focus has been the tanks.
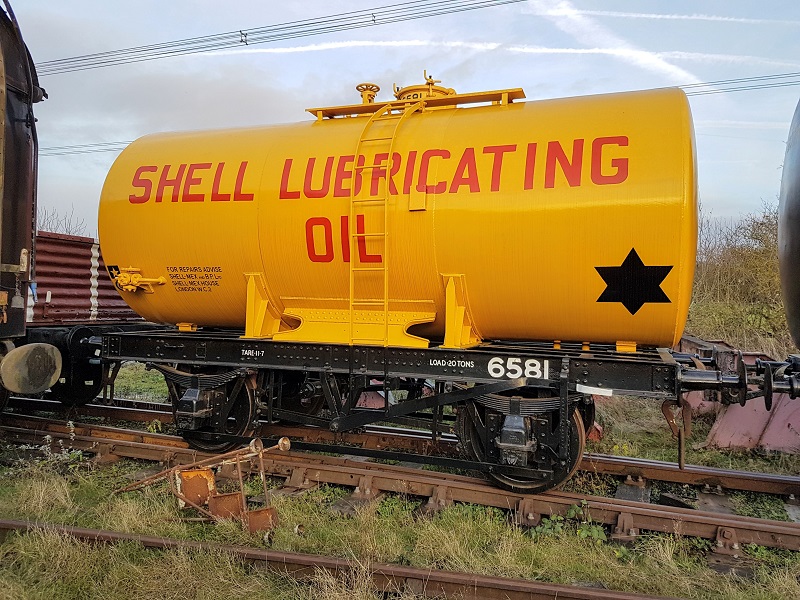
The plans for a tank train first saw its inception with the Swithland wagon group who made a great effort with our first 2 contenders. Privately owned 6071, built by Charles Roberts in 1949 for Shell Mex & BP Ltd to transport fuel oil and later used by BR as a Departmental tank, as well as our very own 6581 another Shell Mex & BP Ltd tank although built by Fairfield Bridge & Engineering in 1948 and used for Lubricating Oil and again latterly used as a Departmental tank, both saw there first outing in 2018.
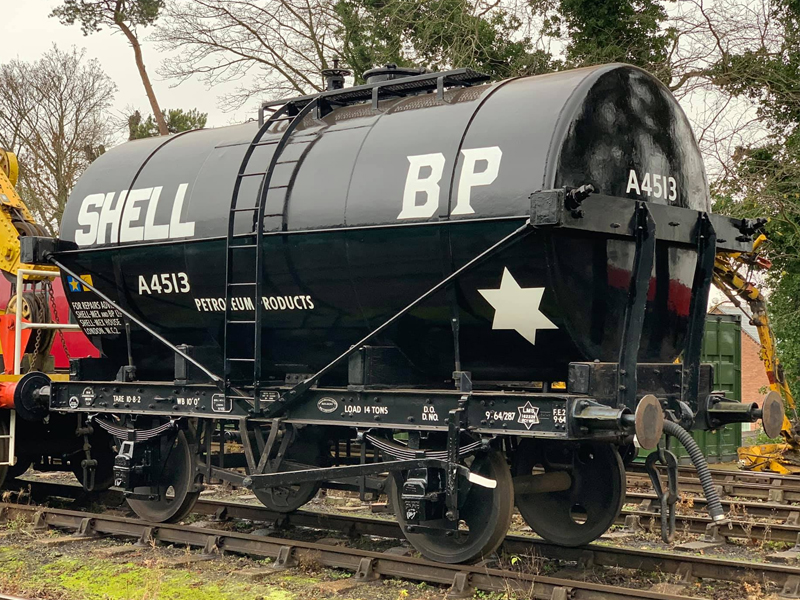
Next to see the light of day was 4513 another Shell Mex & BP Ltd tank used for Petroleum spirit built by Hurst Nelson in 1941, this came in to our care towards the end of 2019 and received a top half refresh last year, sparking our current desires to progress with a tank wagon train.
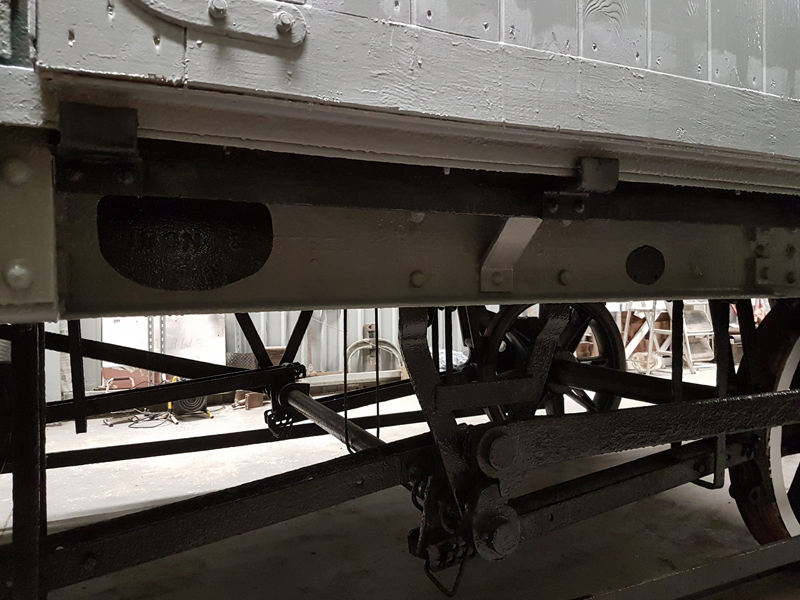
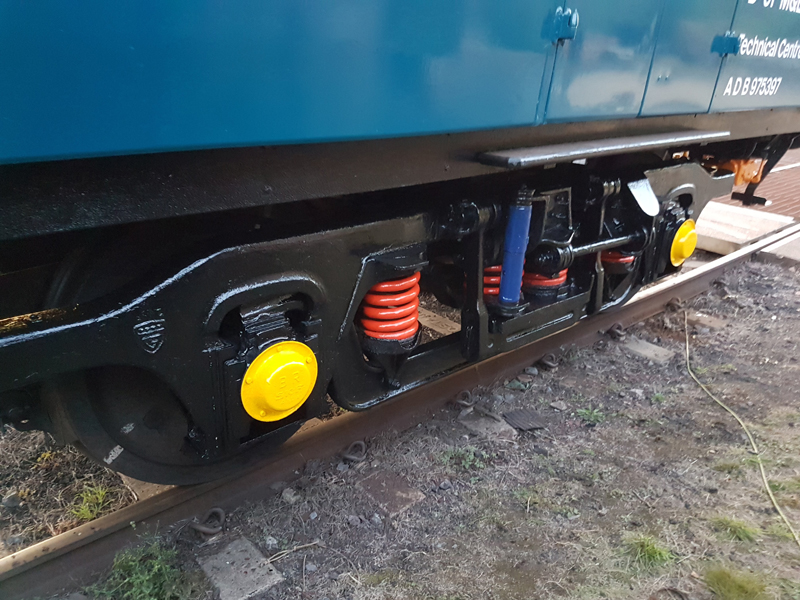
Our next vehicle has been the focus of a number of our recent updates but we shall take this opportunity to discuss in a little more depth its unique suspension, that is unique to the GCR, quit common on the national network.
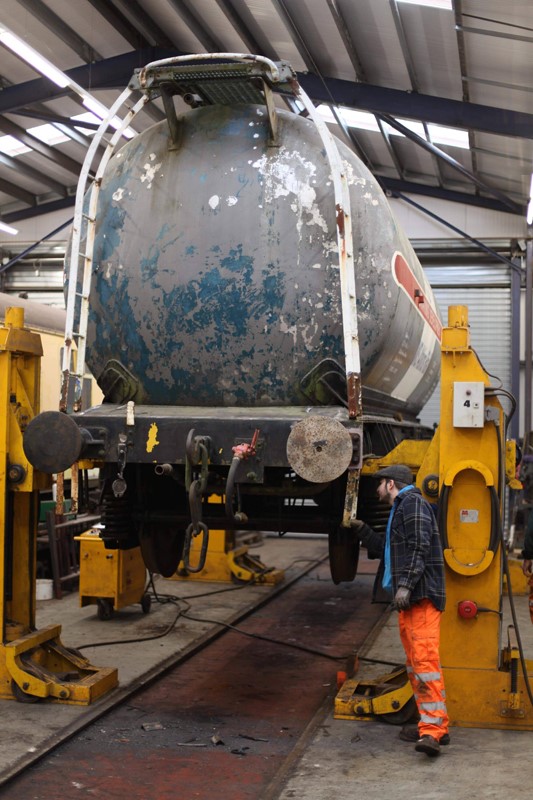
So 1408 a China Clay Slurry tank built by Charles Roberts in 1965 had a fair amount of attention which included lifting the vehicle for suspension inspection.
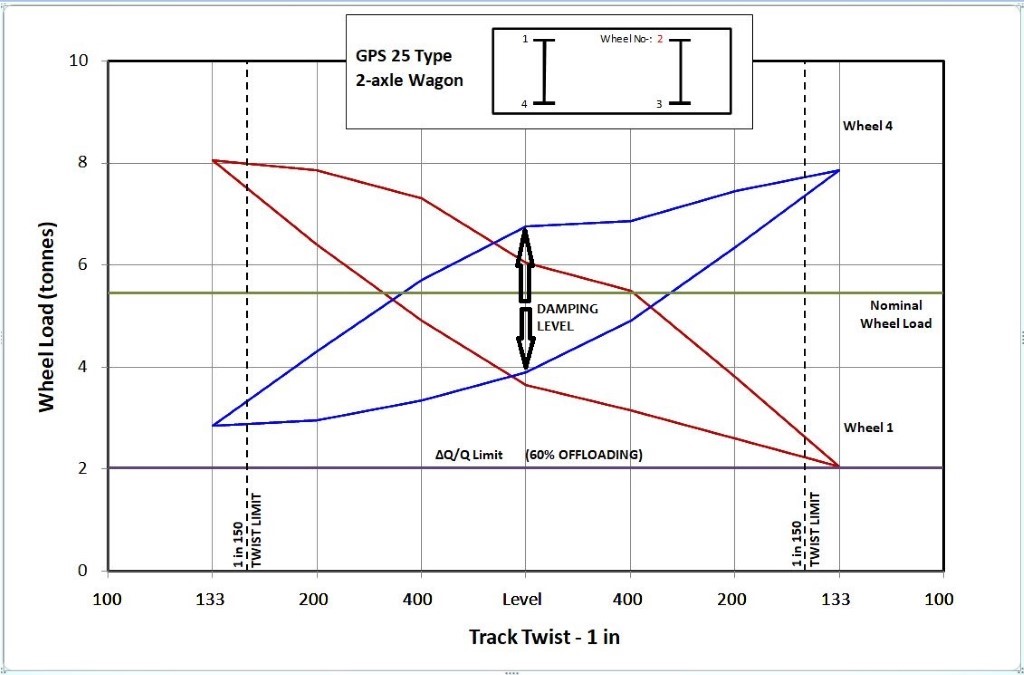
If the damping in the suspension of a wagon were to be too low this could cause the vehicle to bounce uncontrollably leading to a derailment; likewise, if the damping level is too high then the suspension will not move freely enough to accommodate any undulations or twists in the track which again could also lead to a derailment, particularly at low speeds.
When 1408 was new the Gloucester pedestal suspension design would have been tested to ensure the level of spring stiffness and damping present would be suitable to allow the wagon to accommodate undulations or track twists. The test called a torsional stiffness test (or Delta Q/Q) was carried out on a calibrated weighbridge, where the wagon is subjected to a defined twist whilst measuring each individual wheel load. The amount of load on each wheel must remain within 60% of the average wheel load to pass the test.
The first graph below shows the test results from a torsional stiffness test where the wheel load remains within the limit when the wagon is twisted to 1 in 150. The thickness of the band of results for each wheel gives an indication of the level of friction damping in the suspension.
Whereas this second graph shows that the wheel load on wheel 2 drops below the 60% offloading limit; in this case the combination of the stiffness in the suspension or the wagon underframe and the level of friction damping is too great therefore a change to the design would have been necessary.
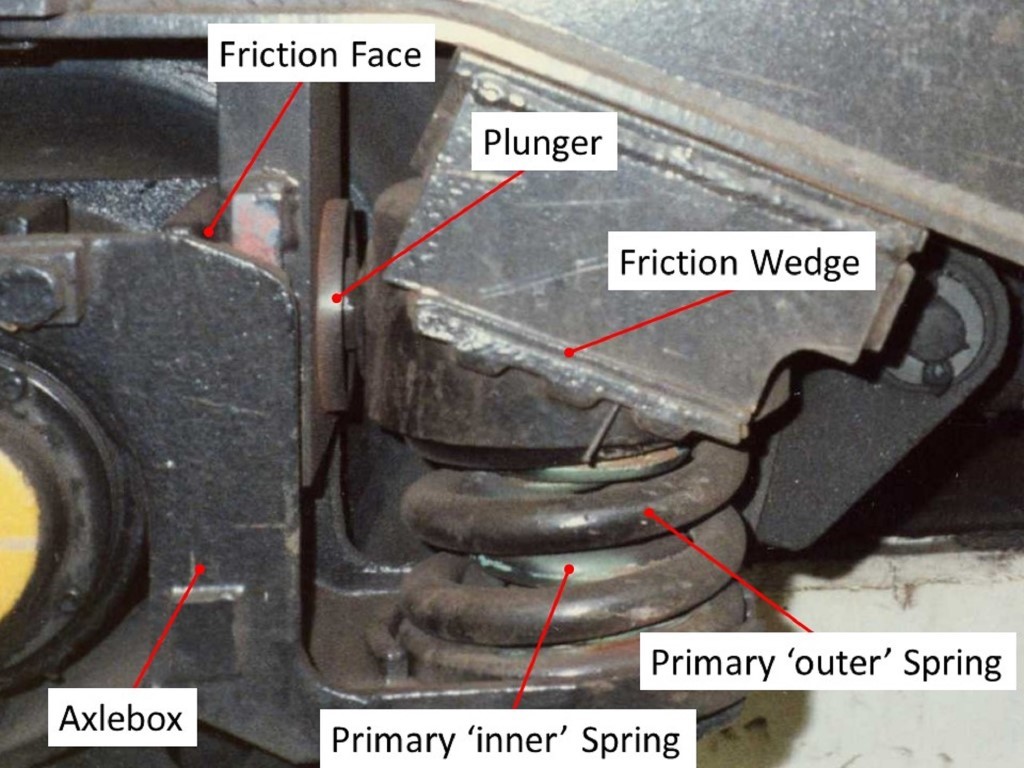
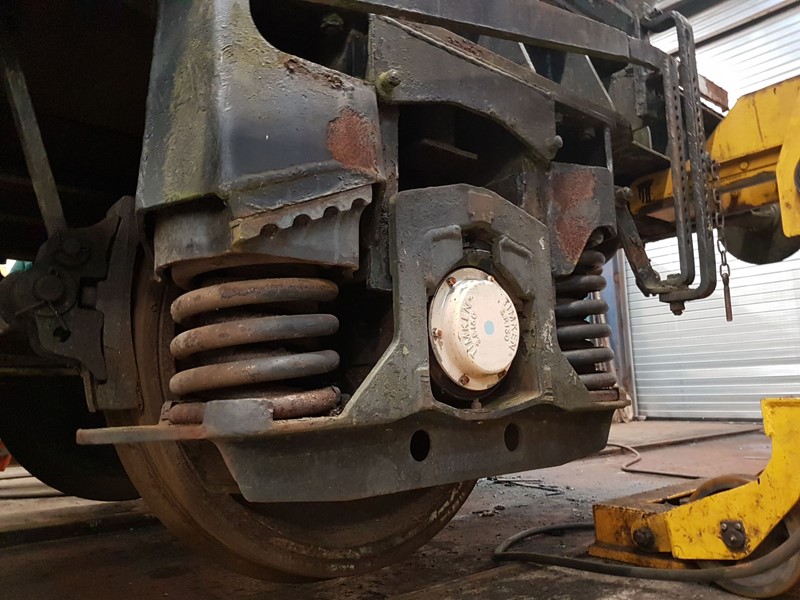
Once a wagon has passed its test then a maintenance plan must be implemented in order to maintain its compliance. In the case of 1408, we must ensure that the friction dampers continue to operate as they did when the suspension type was initially tested, therefore we undertook checks of the condition of the friction surfaces on the axlebox and plunger, and ensuring the freedom of operation of the friction wedge and plunger.
In order to do this we lifted the wagon using the vehicle lifting jacks at Rothley until all the weight was released from the suspension and the condition of the friction surfaces could be checked. Whilst the wagon was lifted we could also check the springs for any fractures.
When lowering the wagon back onto its wheelsets the operation of each friction wedge and plunger was noted, the lift and lower process was repeated a few times to check there was no sticking of the components.
After lowering the wagon back onto its wheelsets a check of the buffer heights was made to ensure it had lowered fully and evenly, then the wagon was shunted around the yard a few times to settle the suspension before the buffer heights were checked again and confirmed to be within tolerance.
Our checks on 1408 confirmed all was in order and that the suspension is operating as it should, therefore ensuring wheel unloading is maintained within the limit levels. The diagrams and reference material are taken from Dave Bower’s book Rail Vehicle Testing
As the second update of this year confirms our focus is now on 3436 a 22T B Type Esso tank built by Charles Roberts in 1958. This will be returning to its as built Esso condition and the templates are already ready. We are just waiting for the opportunity to return and complete it.
Following 3436 will be DB998926, this is a BR 14T departmental creosote tank built by Charles Roberts in 1959. This 3rd lockdown has already been a help, as my research has successfully identified its original region and depot allocation. This being the North Eastern regions West Hartlepool Sleeper Depot. This tank will receive its full departmental livery of Black with straw lettering including this original allocation.
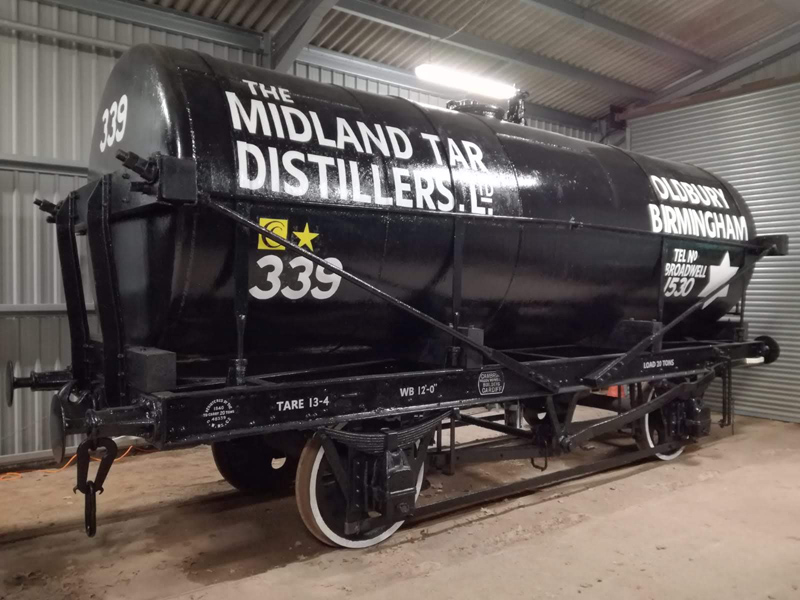
That gives us a possible train made up of 6 tanks, but wait there is one more. Located at the Mountsorrel Heritage Centre is Tar Tank 339, a National Coal Board tank built by the Cambrian Wagon Works in 1940. With the permission of the centre I’m sure this vehicle could run with the 6 to create a train of 7 vehicles.
Unfortunately that is as far as we can go but who knows what the future could bring. There is however, Covid not withstanding, the opportunity to see these tanks together. This has been organised by Timeline events and will be hauled by Standard Class 5 Locomotive 73156. Currently set to be Monday 19th April and Tuesday 20th April, the links will take you to further information, of course this may be subject to change.
Image courtesy of Clive Hanley So hopefully that gives a little insight to our current focus and aims. Next week we have yet to decide but it will likely be the continuation of our vehicle profile series started during the first lockdown.
The most asked question received in our inbox relates to the specific colour of our vehicles, BR was very good at cataloging items within their own numbering system so looking through any BR documentation of the period you will be quoted a BR catalogue code. This is all fair and well until you try and order paint from a modern-day merchant.
So what we have to do is go back to the British Transport Commission and their specifications, specifically B.T.C. Spec. 32A. Dated 1955 This states the following:
Freight stock Red for the external body on fitted & piped vehicles
BS 381C 446 Red Oxide
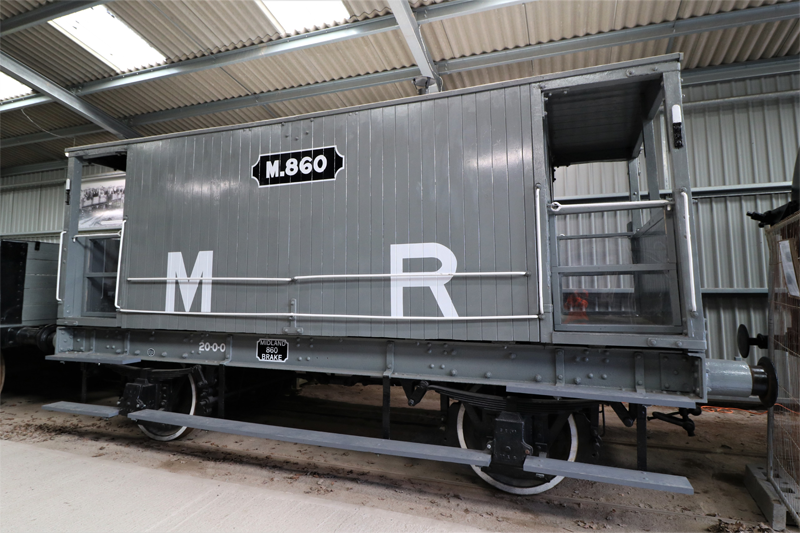
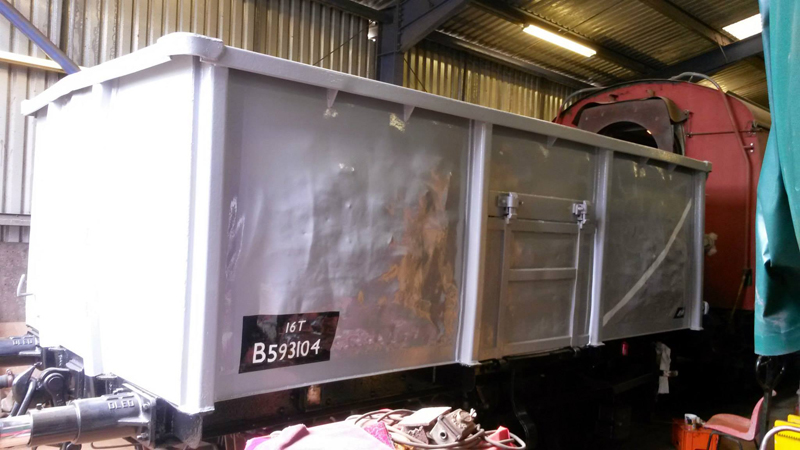
Freight stock Grey for unfitted vehicles
BS 381C 693 Aircraft Grey
Freight stock Red for Brakevan Interiors below 3′ 6″
BS 381C 446 Red Oxide
Stone Colour for Brakevan Interiors above 3′ 6″
BS 381C 361 Light Stone
As easy as that……………….well no not all modern-day merchants will be able to mix paint from the old British Standard 381C. Luckily there are a number of ways of converting to an alternative modern standard. Although we have taken some artistic license and have 2 options for bauxite. So our modern Spec. 32A is as follows:
Freight stock Red for the external body on fitted & piped vehicles
RAL 3009 Oxide Red
Freight stock Grey for unfitted vehicles
BS 5252 18 B 23 Grey
Freight stock Red for Brakevan Interiors below 3′ 6″
RAL 3009 Oxide Red
Stone Colour for Brakevan Interiors above 3′ 6″
BS2660 BS 3-043 Light Stone
RAL 3011 Brown Red is another alternative to “BR Bauxite” Most of our paint is applied by spray in a 3 step process. Prime, Undercoat, and Gloss with the primer depending on the material being painted. We have used 4 types to date, Wood, Metal, Galvanised Steel and Fibreglass. Undercoat matches the Gloss coat so again a fair few varieties mostly dark reds or greys.
For our brakevan interiors we have chosen a different cream being the external Deep Cream as applied to coaching stock which matches an original panel we found within S56010 this being BS381C 353 Deep Cream (Left) or to give the equivalent we used from the Dulux range 27YY 68/470 Golden Bark 6 (right), specification is for the demarcation to be 3′ 6″ high, we applied this to the nearest feature if any at this height, so for BR Standard vans this is the lower window sill height, the Midland was the seat back for the bench side and for the Southern this was below the lower window framing.
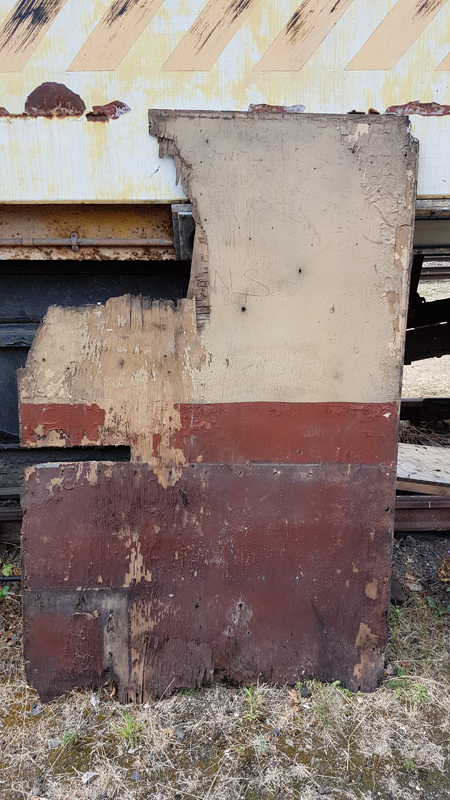
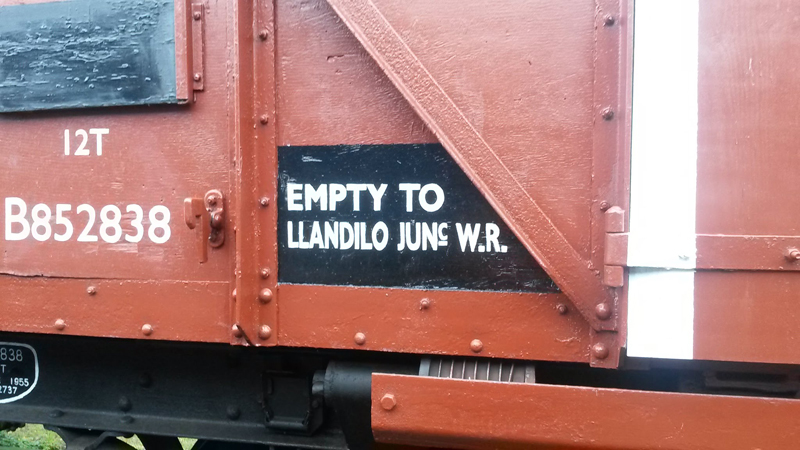
Going back to specifications again. Lettering on all vehicles was white, with variations appearing as part of the 1964 spec. Grey vehicles had there lettering applied to black areas. This was not a requirement for Bauxite stock however black patches were applied when details or markings were changed, either return to location modified, tare weight altered after a modification, like a change of vehicle bearings as an example or when removed from revenue earning to departmental or internal use .
Our only departure from standard practice is the application of bitumastic paint to solebar andbelow, this is to protect the underframes as they take a fair amount of abuse from wet track and brake dust and can be touched up very easily without having to prime and undercoat.
Other colours such as White, Black and Red are simply off the shelf with the lettering I apply being Signwriters “1shot” white.
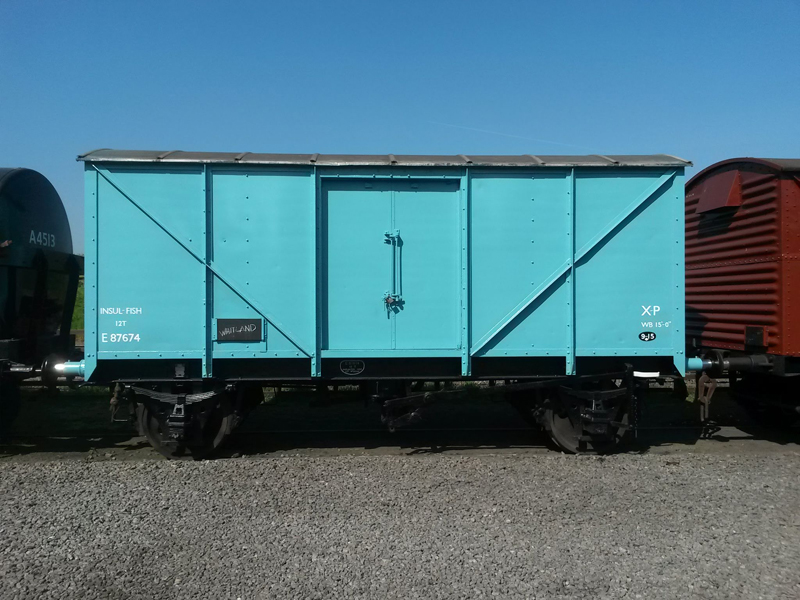
One colour that’s has gone down like Marmite is the Ice Blue applied to our fishvan, this colour came about, in 1964, as a result of the British Trawlers Federations fears that the public perceived these visably dirty white vans as being the same internally. The majority of vans only received blue marking panels although a percentage did receive the all over colour and E87674 was one of these. The spec being BS381C 112 Artic Blue (Left) with a modern alternative being BS2660 BS 7-084 Feista Blue (Right)
Last colour to speak of is yellow. This is were it gets interesting BR spec was BS381C 356 Golden Yellow (Left) with our modern equivalent being BS2660 0-003 Golden Yellow (Right). This is used for warning ends, roller bearing caps and yellow markings post 1964 but the interesting bit was during the change from half to full yellow ends on diesels the actual colour was whatever yellow you could get from the nearest hardware shop. Having spoken to an ex BR Fitter he told me that once steam had ended and the instruction went out to paint full yellows there was not enough Warning Panel Yellow in the BR Stores the instruction went out to get any yellow you can.
This final statement above really covers all the paints discussed in this feature as well as any railway applied paint. There were so many BR works and the paints were hand mixed the variations would have been massive. So the above is all to Specification as mixed by a modern computer that can re create this time after time, back in the 50s and 60s colours would vary even within the same works depending on who was mixing it.
Our choice is to do them all the same and allow the weather to make the variations, however others do chose to mix that variation in at the initial painting stage. There is no wrong way or right way its down to individuals and how they wish to present there own fleets. The key is not to get bogged down in precisely what the colour should be just as long as its close/similiar or simply evokes a memory or feeling. Above is what we do and once complete in a rake, although not prototypical for a fully restored rake to run together it does look good, and we are proud.
[wpvideo rzuMgqqz]
Finally it is hoped that this is the last of our Covid-19 features, I have a meeting and site visit with the GCR to finalise COVID precautions, this has also included permission for myself to undertake restoration work from Wednesday with the aim of a reduced gang authorised to return from next Saturday. This is still of cause under finalisation of precautions and fingers are very much crossed.
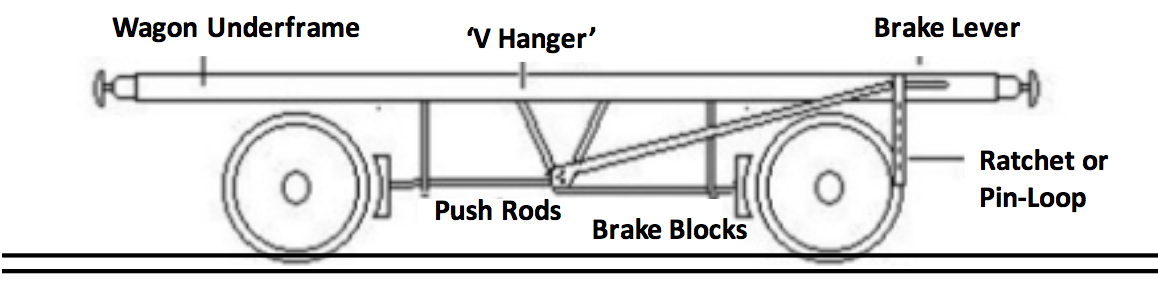
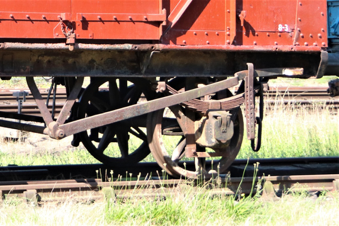
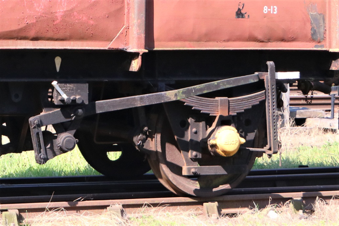
Early wagon brakes were operated by a simple lever and acted on only a single wheel, however from the 1880s the handbrake design by Morton that we see on many of our wagons was developed.
The brake lever extended upwards from a centrally mounted ‘V hanger’ and brake blocks were pressed against the wheels by push-rods which passed through metal supporting loops called ‘brake hangers’. The long brake lever allowed the shunter to exert a considerable force on the brakes. Levers generally extended up towards the right hand end of the body and the handle on the end of the brake lever was usually painted white to make it more visible.
Whilst early wagons had single push blocks on one side of the wagon only, as the weight of wagons and their loads increased so did the amount of braking effort required. Greater braking effort came from using brake blocks on both sides of the wagon and later by using clasp brakes which have two blocks per wheel.
Various designs evolved to transmit and multiply the applied lever effort to the brake blocks to ensure that sufficient brake force could be easily applied to hold a loaded wagon on a gradient. A cam or slotted link arrangement is used so that the handbrake on either side of the wagon operates the brakes on both sides via the transverse shaft.
Example of cam operated brake transverse shaft lever handbrake.Example of slotted link operated brake transverse shaft lever handbrake.A ratchet or ‘Pin-Down’ loop is used so lever can be pushed down and hooked into the ratchet or pinned to secure the brakes.
Handbrakes can also be used during the operation of partially fitted or unfitted freight trains which have no means for the driver to brake the unfitted wagons when he needed to slow down or stop the train. The guard ‘Pins Down’ the handbrakes at ‘Stop and pin down wagon brakes’ locations (usually prior to a severe downhill section of track and known by train crew as part of their route knowledge) so that the handbrakes help ensure that the driver retains control of the train on the downhill section. The train then stops again at the bottom of the incline to allow the guard to ‘take up’ the handbrakes (release them).
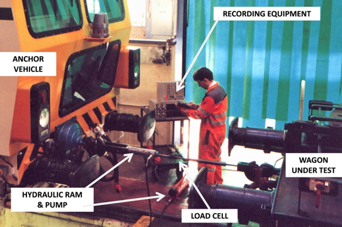
The effectiveness of the handbrake on a new design of railway vehicle is established by conducting a static test, whereby the force needed to move a vehicle along the rails, with its handbrake applied, is measured. This resulting force is used to determine the gradient on which the handbrake will hold the vehicle.
In order to move the test vehicle along the rails, a hydraulic ram fitted with a calibrated ‘Load Cell’ is installed between the drawgear of the vehicle under test and an anchor vehicle on the same line. The anchor vehicle was parked with its brakes fully applied and chocks placed tightly under each wheel.
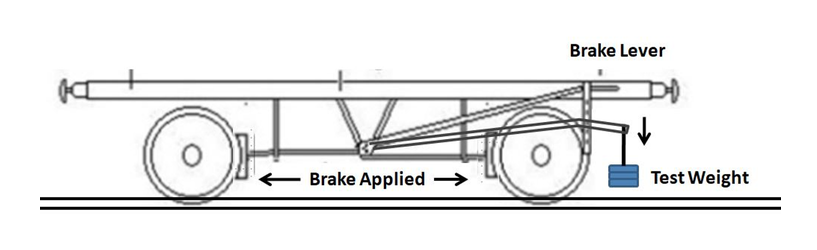
A test is not valid if the wheels slide along the rails, therefore it is important to carry out a test within a workshop, where the rails are clean, dry and preferably level. To ensure a consistent and representative application of the handbrake lever, weights are attached the lever that are equivalent to the standard level of effort that could normally be applied at the lever end by the average person weighing about 60kg applying the handbrake. The test is always repeated to assess the performance of the handbrake when applied from both sides of the vehicle.
The acceptability of the performance of a parking brake was assessed by establishing the gradient on which the vehicle under test could be held without rolling away. The British Railways standard requirement for the design of freight wagon handbrakes is such that each wagon must be able to hold its fully laden weight stationary on a gradient of 1 in 40.
The hydraulic ram is operated either by a hand pump or by an electrically powered hydraulic pump in order to haul the vehicle under test for a distance of between 8and10inches along the rails. The measurements taken from the load cell of the peak value of resisting force are used to calculate the equivalent holding gradient result as follows:-
Where:-
After each test is completed it is necessary to return the vehicle back to its original position ready to start the next test.
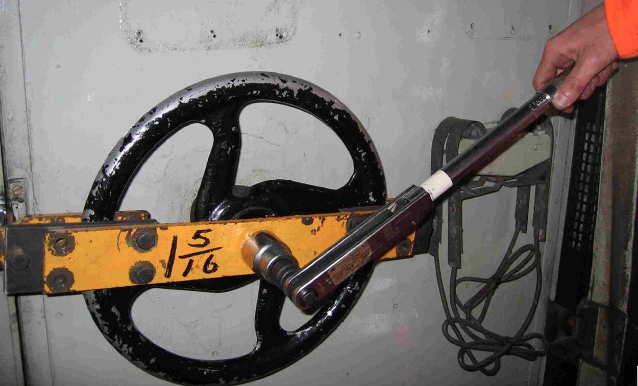
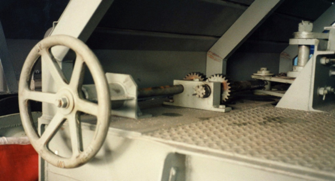
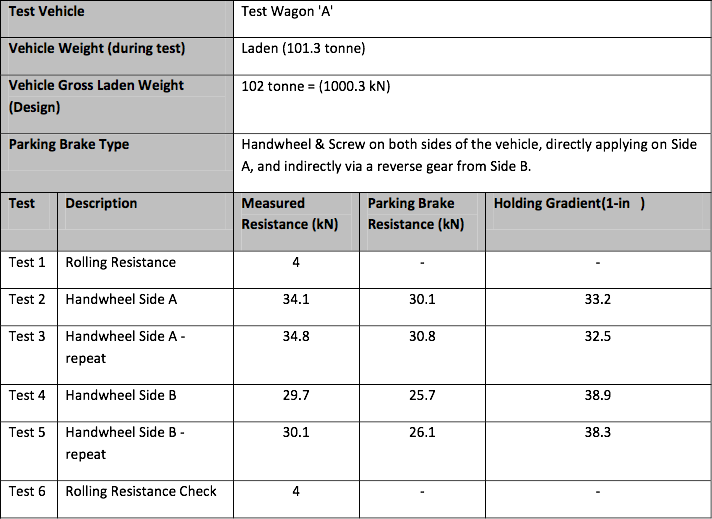
Many locomotives, coaching stock vehicles and newer designs of wagons are fitted with a handwheel & screw type method of applying the handbrake.
The principle and method of testing is very similar however instead of using weights applied to the handbrake lever, a specified level of torque is used when applying the handwheel. This is calculated and applied with a calibrated torque wrench based on the diameter of the handwheel and the standard level of effort of 500Newtons applied at the handwheel rim.
An example of the table of results produced during a handbrake test on a wagon fitted with a handwheel type handbrake.
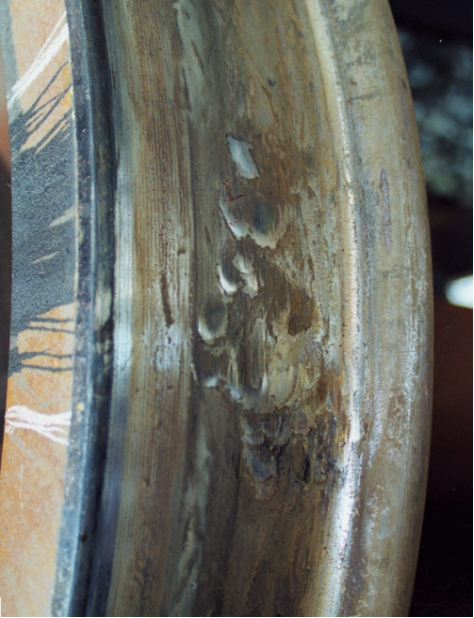
In general the handbrakes fitted to freight wagons are more than sufficient to hold a loaded wagon on a steep gradient when applied fully; therefore when they are applied to an empty wagon their effectiveness is significantly increased. As such, if an empty wagon is moved with its handbrake ‘ON’ then the effectiveness of the brake will cause the wheels to lock and slide; this can very quickly cause significant damage to the wheelsets in the form of wheel-flats and cavities that are costly to rectify.
This is an example of wheel tread damage caused by operating a vehicle with a handbrake on.